Flash Sale 70% Off
Give customers details about the banner image(s) or content on the template.
Are You One of Our Winners?

Ready to give yourself that perfect, salon-quality layered cut without leaving your house? While it might seem intimidating, learning how to cut layered hair at home is completely achievable when you break it down. The entire process hinges on three key stages: gathering the right tools, sectioning your hair properly, and using a cutting technique that suits your hair type.
With a bit of expert guidance, you can create the beautiful movement, volume, and shape you’ve been dreaming of. This guide will walk you through every step, ensuring you get a fresh new look you can feel confident about.
Learning how to cut your own layers is a game-changer. It puts you in complete control of your style and, let's be honest, saves a significant amount of time and money. With a little patience and the right instructions, you can achieve a look that adds the perfect amount of volume and texture to your hair.
The at-home grooming trend has exploded, showing a major shift in how confident people have become with their own skills. The global market for DIY haircut kits is projected to reach a staggering USD 1,868.58 million by 2033. This boom proves that more of us are trusting ourselves to get professional-looking results, even with more complex styles like layers. You can see the market trends for yourself here.
Choosing to cut your own layers comes with some pretty sweet perks beyond just skipping a trip to the salon. Knowing what they are can help you jump into this with the right mindset.
Think of this guide as your personal haircutting coach. We're walking you through everything, from picking out the right shears to mastering cutting methods for any hair type. We'll demystify the whole thing so you can create a look that makes you feel amazing.
To give you a head start, here’s a quick checklist of everything you’ll need to have on hand before you even think about picking up those scissors.
| Category | Essential Item | Why It Matters |
|---|---|---|
| Tools | Professional Hair Shears | Regular scissors will crush your hair cuticles, causing split ends. Shears give a clean, sharp cut. |
| Tools | Hair Clips or Ties | Essential for keeping your sections neat and tidy. You can't cut what you can't see! |
| Tools | Fine-Tooth Comb | Helps create clean partings and ensures hair is detangled for an even cut. |
| Prep | Clean, Dry Hair | Cutting on dry hair (especially for beginners) shows you exactly how the layers will fall naturally. |
| Prep | A Well-Lit Mirror Setup | You need to see your head from multiple angles. Two mirrors (one in front, one handheld) work great. |
Having these items ready will make the entire process smoother and help you achieve a much more professional-looking result.
Ultimately, cutting your own layers isn't just about the haircut—it's about feeling capable and in control. But a great cut starts with a great foundation: healthy hair. A solid hair care routine is non-negotiable because it ensures your hair is strong and ready for a cut. The right regimen makes all the difference in how your final layers will look, feel, and behave. Before you start snipping, make sure you're setting your hair up for success by building a routine for beautiful hair.
A successful at-home haircut is all about the prep work. Before you even think about snipping a single strand, carving out a dedicated, well-equipped space is the first step toward getting a look you'll actually love. Think of it as building your own mini-salon right in your bathroom.
The most critical tool in your entire kit is a pair of professional hair-cutting shears. Seriously, put the kitchen scissors back in the drawer. Using regular craft or kitchen scissors is a surefire way to get split ends and frayed tips. Those blades are blunt and designed to crush, while proper shears glide through for a clean, precise cut that keeps your ends healthy. This single investment will make a world of difference.
Besides the shears, a few other items are non-negotiable if you want a smooth, accurate cut. Having everything within arm’s reach means you won’t be scrambling around with half your hair clipped up.
Just like any pro, keeping your tools clean is vital for performance and hygiene. For instance, knowing how to properly clean hair clippers and shears ensures they stay sharp and effective for every single trim.
One of the biggest questions people have when learning to cut layers at home is whether to start with wet or dry hair. There's no single right answer—it all comes down to your hair's natural texture.
For those with straight or slightly wavy hair, cutting on damp (not sopping wet!) hair is usually your best bet. The water weighs the hair down, letting you create incredibly clean, sharp lines. Just remember that your hair will look shorter once it dries, so always cut about an inch longer than you want the final length to be to account for "shrinkage."
Pro Tip: If you're cutting damp hair, keep a spray bottle handy to mist sections as you go. If one part dries out before you get to it, the final cut can end up looking uneven.
On the other hand, if you have curly or coily hair, always cut it dry. Curls have their own unique patterns and personalities, and cutting them wet completely hides how they’ll naturally sit and spring up. A dry cut allows you to work with your individual curl families, shaping them exactly how they'll look every day. This technique, often called a "curl-by-curl" cut, is the best way to avoid creating weird shelves or taking off way too much length from tighter coils.
To prep for a dry cut, just style your hair like you normally would, but go easy on the products. You want it to fall naturally so you have an accurate canvas to work with.
No matter which path you choose, always start with clean hair. Wash and condition thoroughly to get rid of any product buildup. Then, gently detangle with a wide-tooth comb or your fingers, starting from the ends and working your way up to the roots to minimize breakage. A smooth, knot-free base is the foundation for a beautiful, even layered cut.
Alright, it's time for the fun part—actually cutting those layers and bringing your vision to life. The real secret to a balanced, salon-worthy cut at home isn't some crazy technique; it's all about your prep work. Before you even think about making that first snip, you have to section your hair properly. Think of it as creating a roadmap for your haircut so you don't get lost halfway through.
We're going to walk through two of the most popular and genuinely beginner-friendly methods that give you fantastic results right in your own bathroom. Each one creates a slightly different look, so you can pick the one that best fits the style you're going for.
This little visual breaks down the foundational steps that apply to any successful at-home haircut, from getting your tools ready to sectioning everything off.
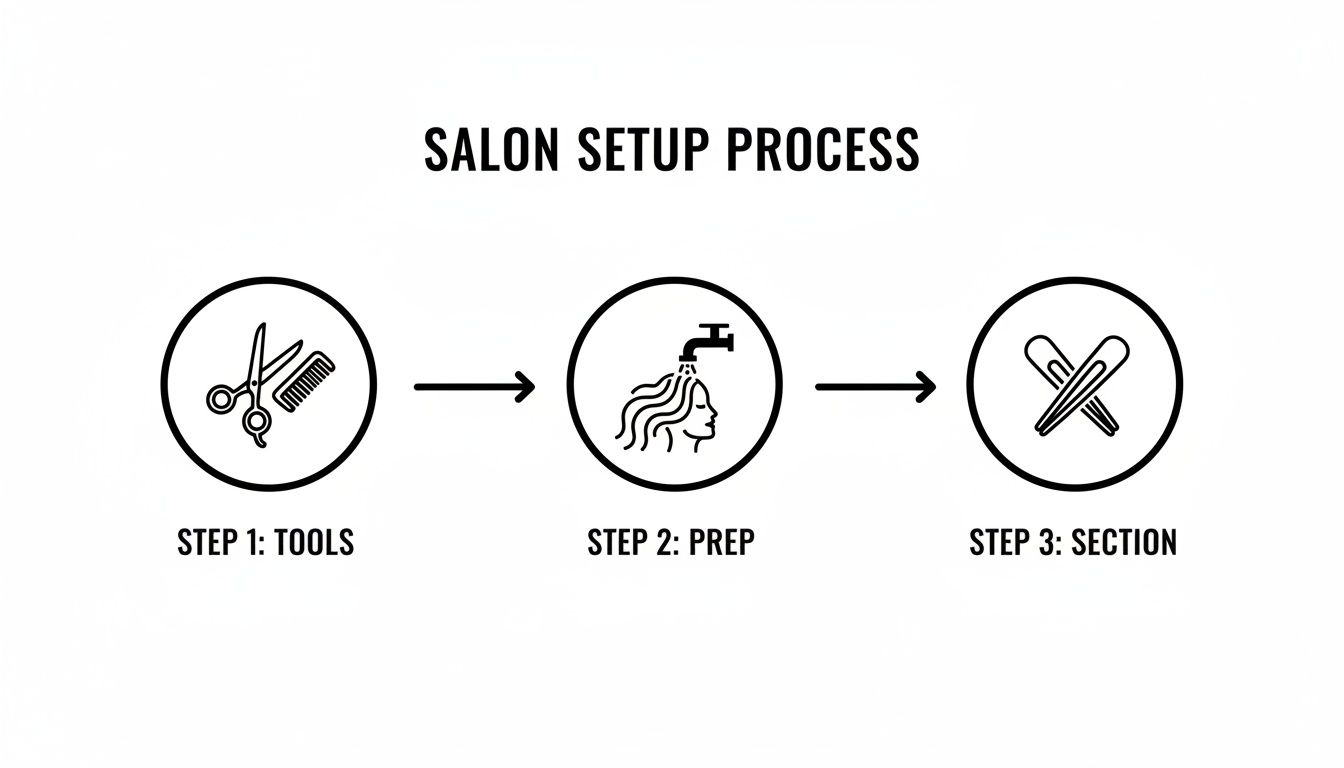
As you can see, it’s a simple progression. Gathering your gear, prepping your hair, and creating clean, manageable sections are the pillars that support a precise, even cut.
You've probably heard of this one, often called the 'Unicorn Cut.' It’s hands-down the easiest way for a beginner to create simple, face-framing layers. This method is a game-changer for anyone with medium to long hair who wants that classic V-shape in the back with softer pieces that fall beautifully around the face.
First things first, brush your hair until it's completely free of knots. Flip your head upside down and gather every last strand into a single, tight ponytail right at the top of your forehead—yep, just like a unicorn horn. Make sure the base of the ponytail is super smooth and has no bumps.
Now, take a second hair tie and slide it down the length of the ponytail. Stop when you get to the point where you want your shortest layer to fall. This tie is your cutting guide. If you just want a subtle effect, you might only trim an inch or two. For more dramatic, choppy layers, you can take off several inches.
Hold the end of your ponytail so it's taut, and use your shears to make a clean, straight cut right below that guide tie. When you let your hair down, it will naturally fall into graduated layers, with the shortest bits framing your face. Easy, right?
If you're after a softer, more diffused look instead of really distinct layers, the twist-cutting method is your new best friend. This technique is brilliant for adding subtle texture and movement, and it works surprisingly well on almost any hair length, even bobs.
You'll start by sectioning your hair into manageable pieces, about one to two inches wide. Grab the first section, comb it straight out from your head, and twist it tightly all the way from the root to the end. The tighter your twist, the more texture you'll end up with.
Once the section is fully twisted, take your shears and snip into the twist at an angle. You’re not cutting straight across here. Instead, you'll make small, angled cuts down the length of the twisted hair. This is a form of point cutting, and it’s perfect for removing weight and creating subtle differences in length.
This method is less about chopping off length and more about creating internal texture. It helps layers blend seamlessly into one another and is the perfect way to avoid that chunky, shelf-like look that can sometimes scream "DIY haircut."
Unravel the section, and you'll see the result: soft, almost invisible layers that give your hair a ton of movement without drastically changing your overall shape. Just repeat this process for all the sections, making sure to use consistent tension in your twists for a balanced finish.
A quick word on how you actually cut the hair—the technique you use for the snip itself can dramatically change the final texture of your layers.
Getting a feel for these basic approaches gives you so much more control over your final look. For a deeper dive into how professional stylists use these techniques to build shape and movement, check out our guide on creating texture and dimension with professional hair cutting techniques. It's packed with insights that can really take your at-home skills to the next level.
Layers aren’t a one-size-fits-all kind of haircut. The best ones are carefully adapted to your hair's unique personality. What creates gorgeous, flowing movement in long, thick hair could easily make fine hair look sparse and thin.
The real key to a successful DIY layered cut is learning how to work with your hair, not against it. This is where you graduate from just following steps to actually personalizing your style.
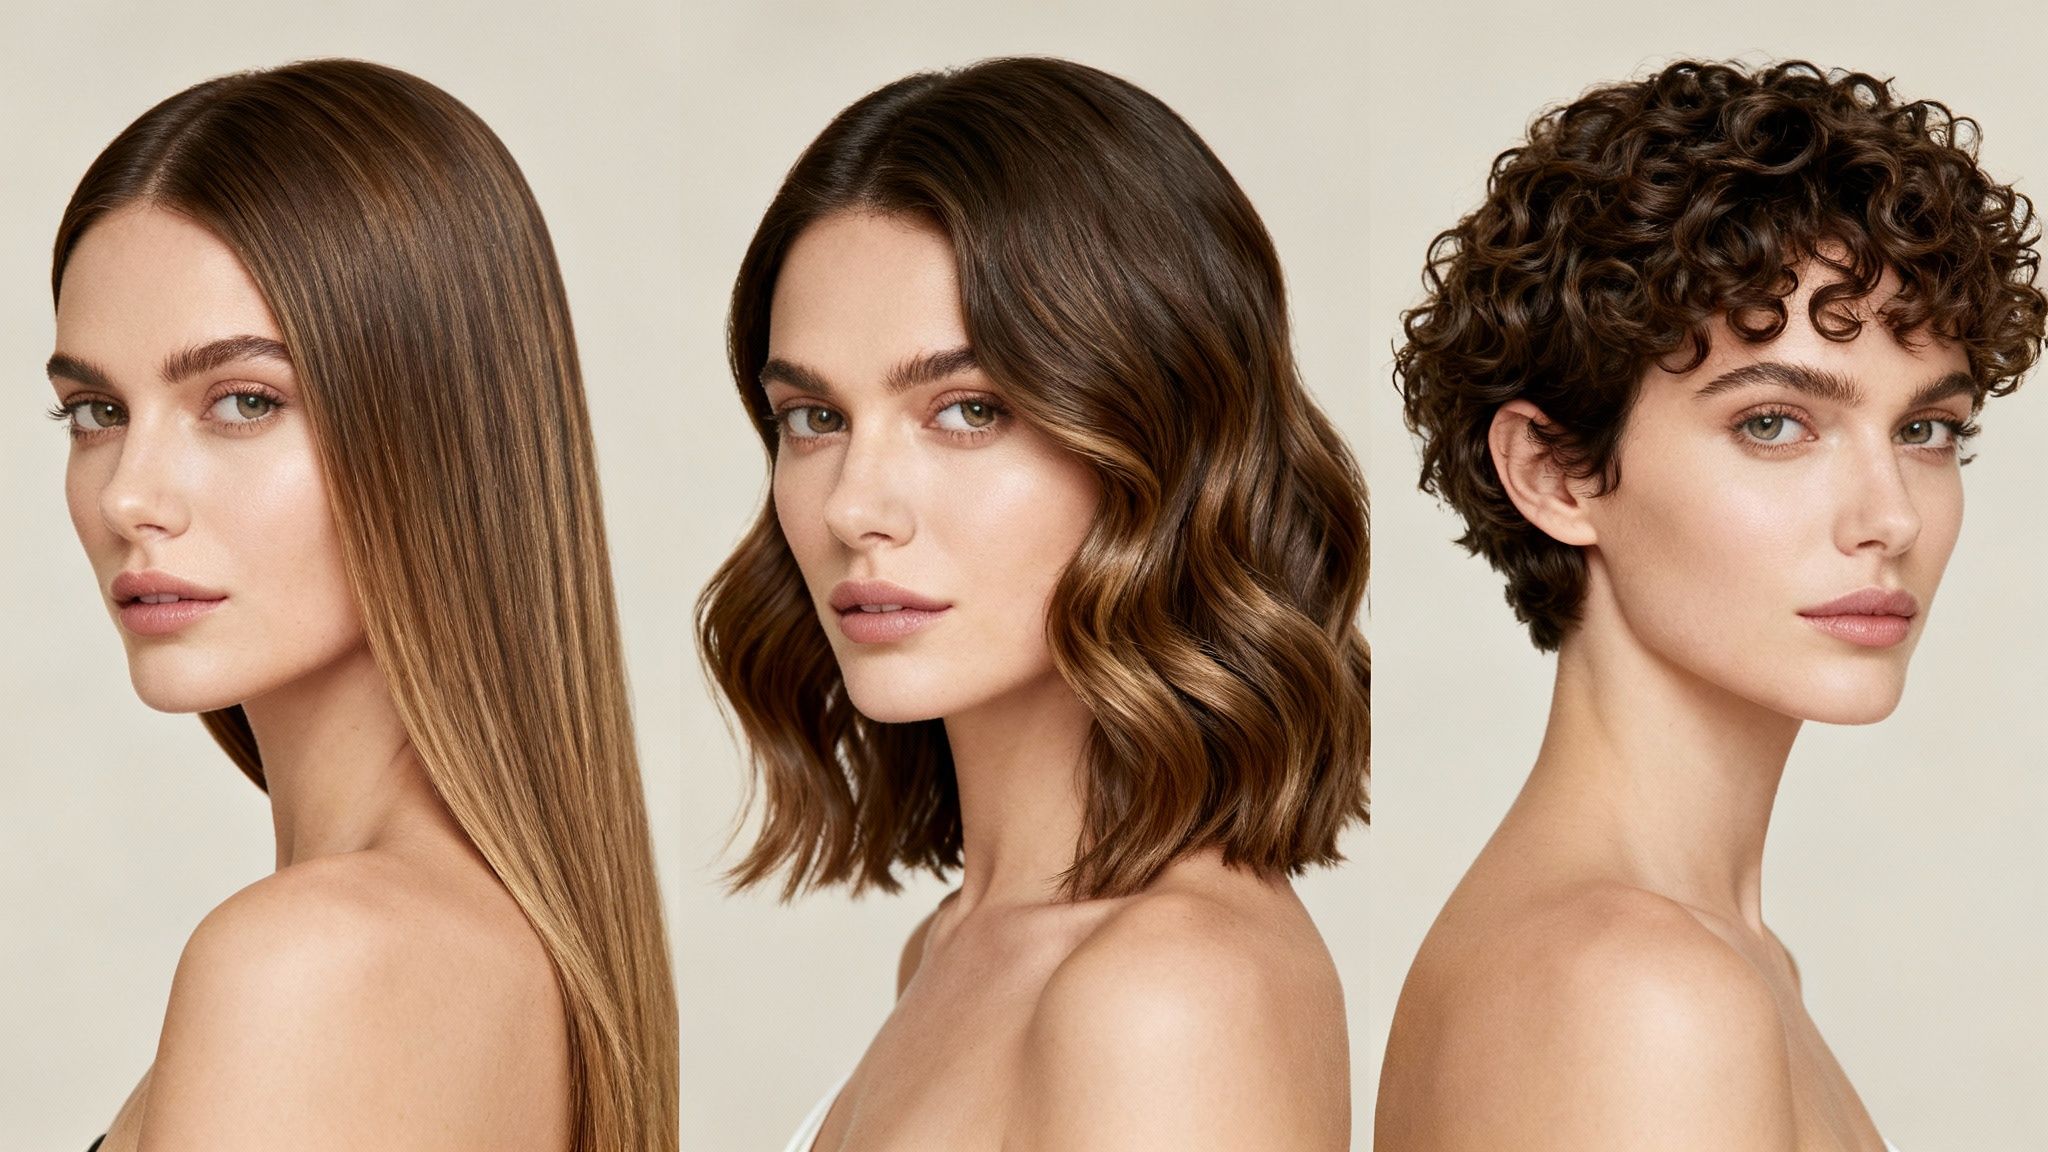
Let’s break down the specific strategies for every major hair type. This will help you get a cut that enhances your natural texture and nails the exact look you’re going for. But first, you need to know what you’re working with. If you're not sure about your hair's texture and density, our guide on how to know what hair type you have is the perfect place to start.
With long hair, the main goal is usually to add some shape and movement without sacrificing that length you've worked so hard to grow. The biggest fear? Ending up with choppy, disconnected layers that stick out.
To avoid that nightmare, your focus should be on creating long, flowing layers that blend together seamlessly.
The "ponytail method" we covered earlier is a fantastic technique for this. When you pull your hair into a high ponytail and snip a small amount off the end, you automatically create layers that are longer in the back and get gradually shorter toward the front. It’s almost foolproof.
Expert Tip: For a really soft, professional finish on long hair, release your ponytail after the main cut. Then, go back and use the "point cutting" technique on the ends of the layers. This diffuses any hard lines and makes the whole style look beautifully blended.
Medium-length hair—think lobs or shoulder-grazing styles—is the perfect canvas for layers that build volume and create shape. The challenge here is to get that lift without making the style look "shelfy" or dated.
For this length, I like to use a combination of techniques. Start by sectioning your hair into a top and bottom half. In the bottom section, keep the layers longer and more subtle to maintain a strong, solid baseline.
The top section is where the magic happens. Here, you can add shorter layers to really build up that body. A great way to do this is to lift sections straight up from your head (at a 90-degree angle) and cut them to match your guide. This method, known as uniform layering, takes out weight and encourages volume right from the roots.
Layers are absolutely essential for short hairstyles like bobs and pixies. They give these cuts their signature texture and shape. Without layers, a short cut can look heavy, almost like a helmet. For short hair, you're not aiming for long, flowing layers; you're creating internal texture.
The twist-cutting method is perfect for this. Just take small sections of hair, twist them, and lightly snip into the twist. This removes bulk and creates that piecey-ness that really defines the style. It works wonders on a choppy bob or for softening the edges of a pixie.
Curly and wavy hair plays by its own set of rules. When you cut layers into textured hair, it’s all about enhancing the natural curl pattern and getting rid of any unwanted bulk, especially at the ends which can create that dreaded "triangle" shape.
The number one rule? Always cut curly hair when it's dry.
Cutting curl by curl lets you see exactly how each springy strand is going to fall. This prevents the shock of cutting a piece that looks long when wet, only to have it shrink up way too short. The goal is to create layers that allow your curls to stack on top of one another beautifully, giving you a rounded, defined shape without the frizz. For wavy hair, this same approach helps encourage your waves to form more defined, consistent patterns.
If you have fine hair, I know the word "layers" can be a little scary. The fear is that by removing any hair, you’ll just make it look even thinner. But here's the secret: the right kind of layers can actually do the opposite, creating the illusion of more volume and body.
The trick is to keep the layers subtle and place them strategically. Forget short, choppy layers all over.
Instead, ask for (or cut) just a few longer, almost "invisible" layers. Concentrate them around your face and through the top sections of your hair. This technique adds movement and lift right where you need it most, without sacrificing the density at your ends. Keeping those ends looking full is the key to making fine hair appear thicker and healthier.
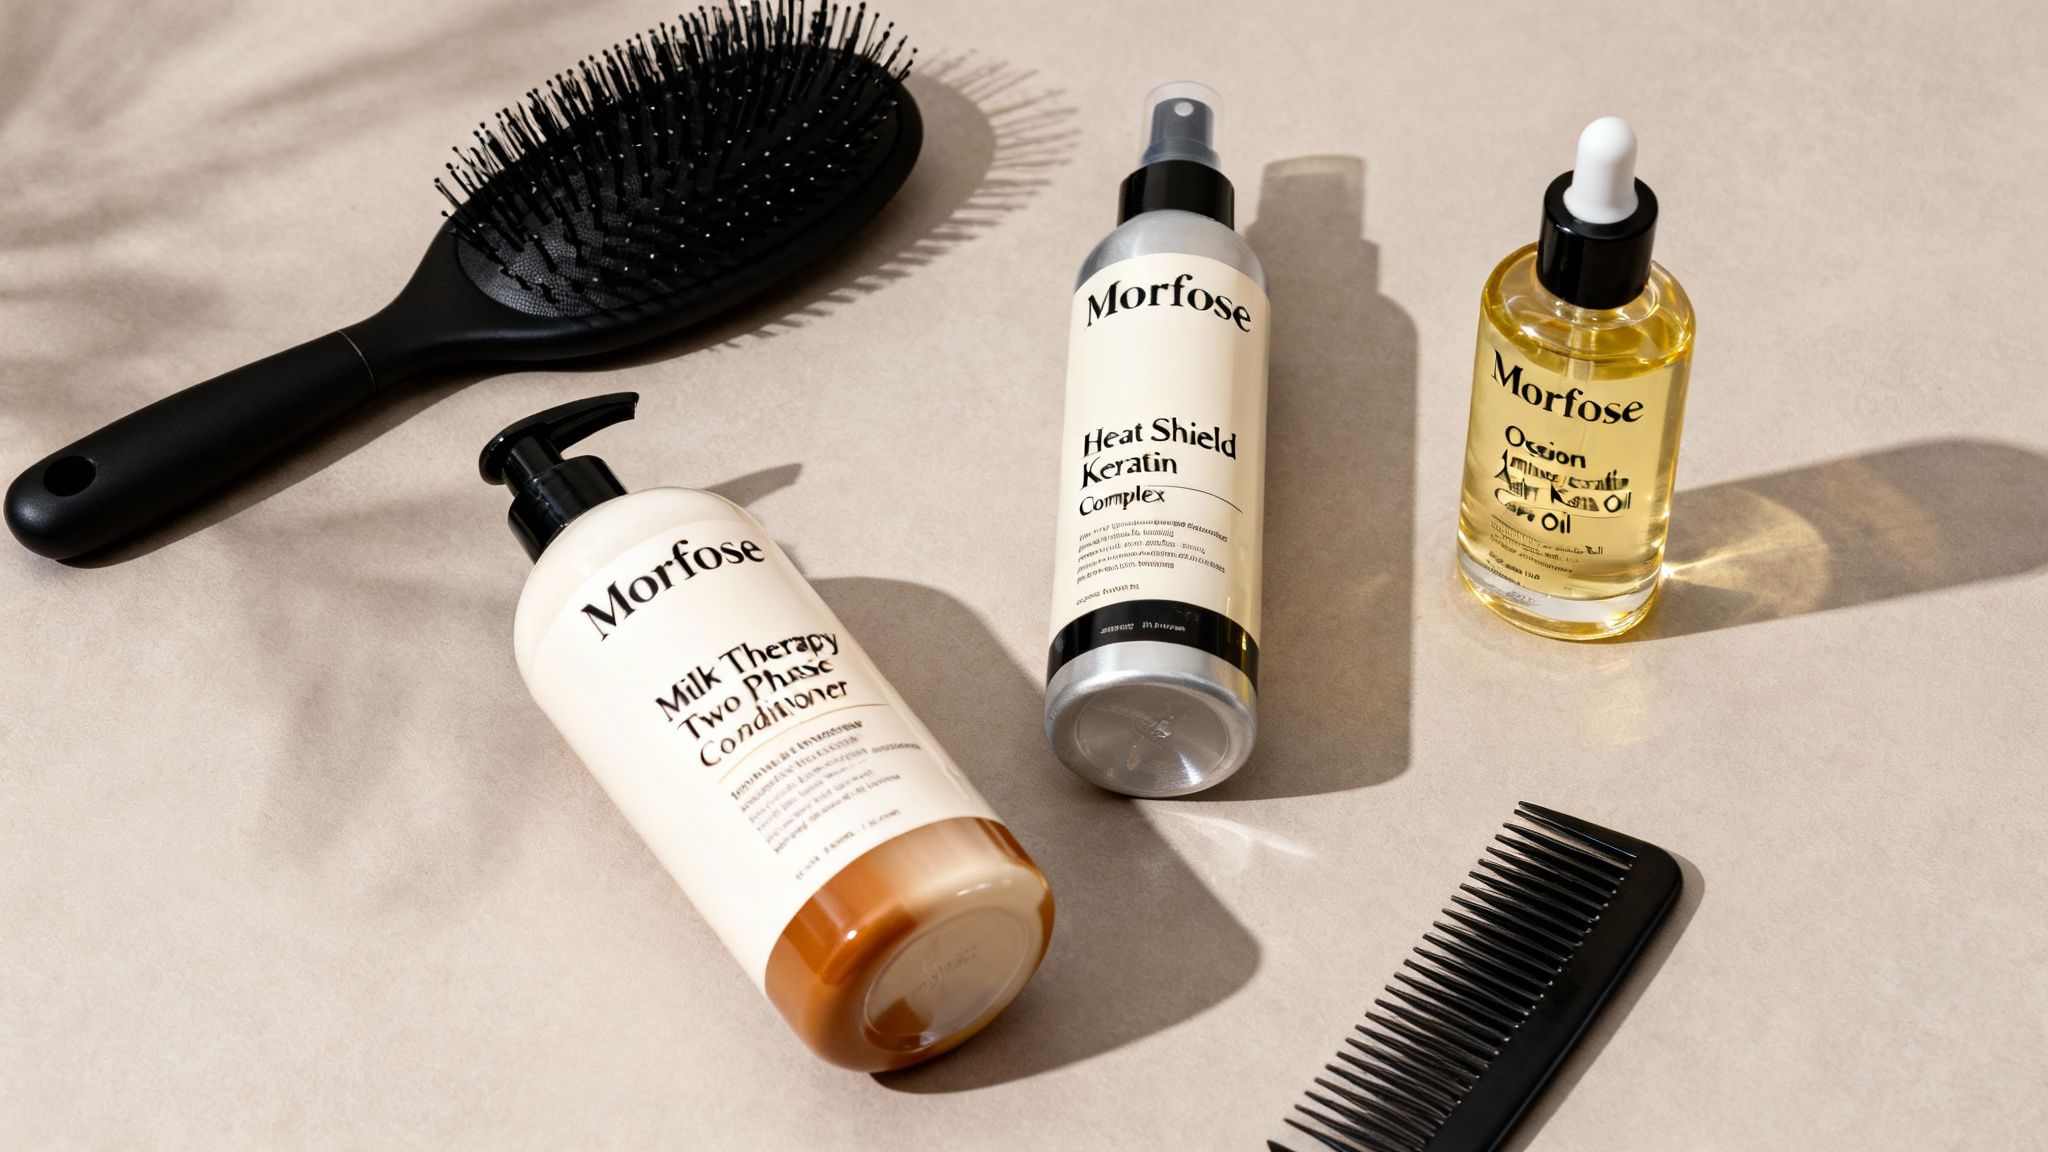
Okay, so you’ve made the cut! But a great haircut is only half the battle. The real secret to a look that consistently turns heads is how you care for and style it afterward. Your new layers have created all this gorgeous movement and texture, and now it's time to show them off. The right products won't just style your hair—they'll also nourish it, keeping those freshly cut ends looking sharp and defined.
First thing’s first: replenish that moisture. Your hair has been through a process, and a lightweight, nourishing leave-in is an absolute must. This is where something like Morfose Milk Therapy Two Phase Conditioner comes in handy. It gives your hair that instant hit of hydration and shine without ever weighing your layers down, letting them move and bounce just like they’re supposed to.
Let's be real, heat styling is often the quickest way to make your new layers pop, whether you're blow-drying for volume or curling for a bit of texture. But applying heat without protection is one of the fastest ways to undo all your hard work, leading to split ends and frizz that can ruin the clean lines of your fresh cut.
A quality heat protectant is non-negotiable. Seriously. Before you even think about turning on that blow dryer or curling wand, generously spritz your hair with Morfose Heat Shield Keratin Complex Hair Spray. This creates a vital barrier between your delicate strands and the high temps of your styling tools. Think of it as insurance for your haircut—it safeguards your hair’s integrity so your layers stay smooth and healthy.
Once your hair is protected, it's time for the fun part. This simple routine is designed to really enhance the volume and definition you just created.
For a Voluminous Blowout:
For Soft, Defined Waves:
The final step is all about adding that polish, taming any rogue flyaways, and making those layers look perfectly piecey. A high-quality hair oil is going to be your best friend here.
After styling, squeeze a tiny amount of Morfose Ossion Amino Keratin Hair Care Oil into your palms and rub them together. Gently run your hands through the mid-lengths and ends of your hair. You'll see it instantly smooth frizz, add a gorgeous shine, and give your layers that perfect definition.
A common mistake I see is applying oil too close to the roots, which can make hair look greasy fast. Focus only on the mid-lengths and ends. You’ll get all the shine and definition without sacrificing the volume you just worked so hard to create.
For the best styling and longevity of your new layers, it's a good idea to supplement your routine with products that work for you. You can explore various hair care product options to find items that fit your hair’s needs. A great leave-in conditioner is also a cornerstone of any solid hair care regimen; you can learn more about how the Morfose Keratin Leave-In Conditioner can help tame frizz and make your hair more manageable. With a simple but effective routine, your DIY cut will look professionally styled every single day.
Let's be real—even the most careful hands can make a little slip-up, especially when you're just learning how to cut layers at home. Before you panic, just know that almost every common mistake has a fix. This is your safety net, here to give you the confidence to correct any little errors and learn as you go.
The most common issue I see with beginners is creating layers that look a bit choppy or uneven. If you step back from the mirror and spot some harsh lines, the solution isn't to keep cutting length off. It's all about blending.
Your new best friend is a technique called point cutting. All you have to do is take the section that looks too blunt, pull the ends taut, and snip vertically into the very tips with your shears. This technique instantly softens that hard edge, creating a much more diffused and professional finish without you having to sacrifice any more length.
Another classic "oops" moment is creating a 'shelf'—that dreaded, obvious line where one layer abruptly stops and the next one begins. This almost always happens when the sections weren't blended together properly. To fix it, you need to diffuse that hard line. You can use the same point-cutting trick right along the edge of the shelf to break it up. For an even better blend, you can also take small, vertical sections of hair that cross over the shelf line and lightly snip into them. This will create a much more seamless transition between the different lengths.
Accidentally snipping a layer shorter than you wanted can feel like a total disaster, but it’s really just a temporary styling challenge. Patience is key here, along with a few clever tricks to get you through the awkward grow-out phase.
Texturizing sprays and different styling methods are going to be your go-to tools. Adding some waves or curls with a curling wand is a brilliant way to help those shorter pieces blend in with the longer ones, making the length difference way less obvious.
You can also use this as a perfect opportunity to focus on promoting healthy hair growth. This is where choosing the right products can make a huge difference in how your hair bounces back.
Incorporating a growth-supporting shampoo into your routine can help nurture your hair follicles and encourage stronger, healthier growth over time. It’s a proactive way to manage the situation while caring for your hair's future.
In this situation, we always recommend Morfose Pro Hair Growth Shampoo with Biotin & Collagen. Its formula is specifically designed to nourish the scalp and hair, creating the perfect environment for healthy growth. While it's not going to magically make your layers grow back overnight, it gives your hair the essential building blocks it needs to grow back strong and resilient. Think of it as supporting your hair from the root up, helping you get through that grow-out phase with healthier strands.
Check out Morfose’s full line of hair care solutions to find the perfect match for your hair's needs.
Even with the best tutorial in hand, it’s totally normal to have a few last-minute questions before you pick up the scissors. Let’s walk through some of the most common things people ask, so you can feel completely confident before that first snip.
Ah, the golden question! The answer really comes down to your hair type, and it's a non-negotiable one. For straight or wavy hair, cutting it while it's damp is usually the way to go. The water gives the hair a bit of weight and tension, which helps you get those super clean, precise lines.
But for my curly and coily-haired friends, you should always cut your hair dry. Always. Cutting it dry is the only way to see exactly how your curls will spring up, clump together, and form their natural shape. If you cut it wet, you're just guessing—and you risk that awful surprise of a piece shrinking up way shorter than you ever intended.
To keep your new layered cut looking sharp and healthy, a light trim every 6 to 8 weeks is the sweet spot. This isn't about taking off length; it's about maintaining the shape and nipping split ends in the bud before they become a real problem.
If you know your hair is prone to splitting, you might want to do a little "dusting" every 4 weeks. This just means trimming the tiniest fraction of an inch off the ends to stop damage from traveling up the hair shaft.
Pro Tip: Trust me, regular maintenance is a thousand times easier than a major haircut overhaul. Sticking to a trimming schedule keeps your layers looking intentional and beautifully maintained, not grown-out and accidental.
If you're brand new to this, you want a method that's forgiving and builds your confidence. The Ponytail Method is, hands down, the most straightforward technique to start with. It’s practically foolproof for creating simple, face-framing layers on medium to long hair.
All you do is gather your hair into a high ponytail right at your forehead, secure it, and then cut straight across the end. When you let it down, the hair magically falls into soft, graduated layers. It’s a fantastic, low-risk way to get the hang of things before you ever think about trying more advanced techniques.
A great cut is the foundation, but the right products are what will truly make your new layers shine. Morfose has a complete line of salon-quality solutions designed to nourish, protect, and style your hair to perfection.
Ready to give your hair the support it deserves? Explore the full Morfose collection today!
