Flash Sale 70% Off
Give customers details about the banner image(s) or content on the template.
Are You One of Our Winners?

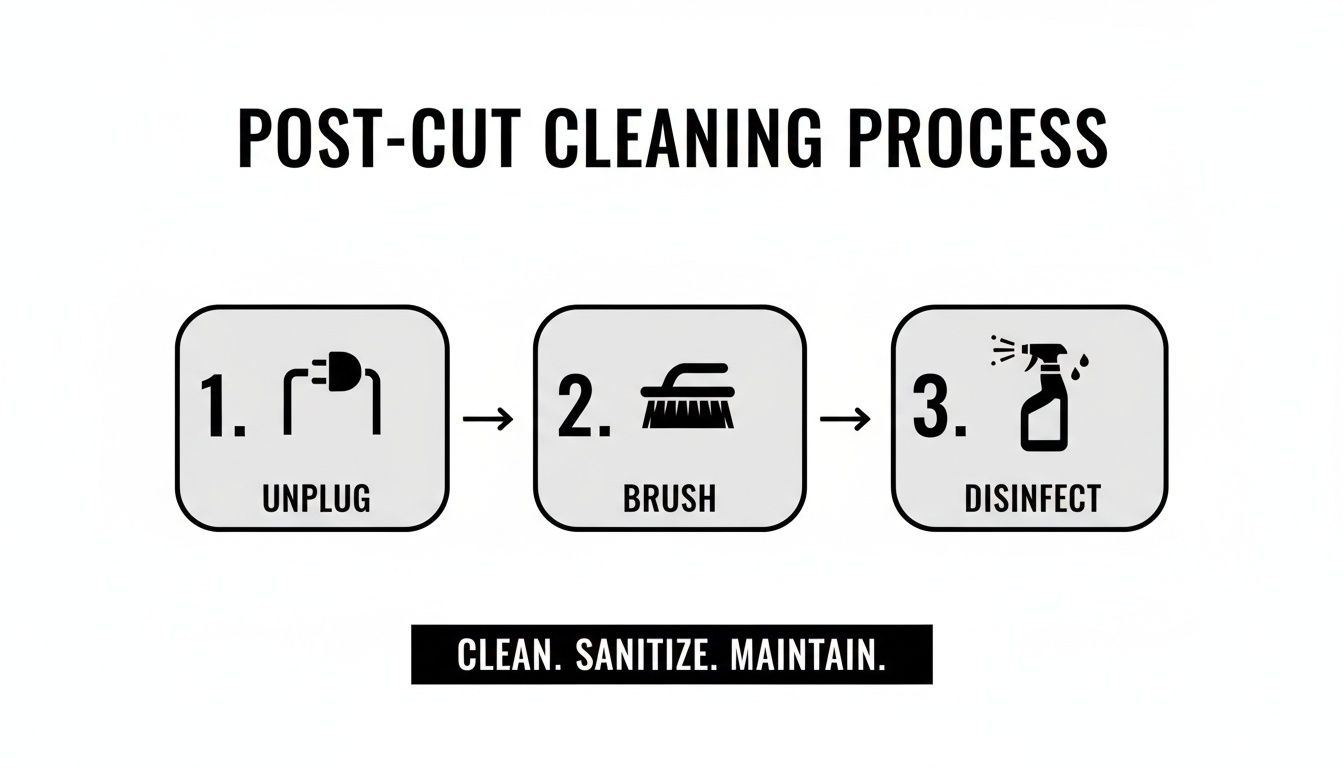
Learning how to clean hair clippers the right way after every use is critical for getting the most out of your grooming tools. A simple, quick routine is all it takes: unplug the device, use a small brush to flick away loose hairs, and finish by sanitizing the blades with a disinfectant spray. This process takes less than a minute but prevents buildup, keeps your blades sharp, and guarantees a hygienic cut every time.
Let's be real—cleaning your clippers feels like a chore after a fresh cut. It’s easy to skip. But what if that simple step was the single most important thing you could do for a perfect haircut? Proper maintenance is so much more than basic hygiene; it’s about protecting your investment, your skin, and the quality of every cut you make.
Each time you use your clippers, they collect a mix of hair clippings, dead skin cells, and product residue. This gunk quickly becomes a breeding ground for bacteria. Understanding how germs spread through objects, a process known as fomite transmission, highlights why clipper hygiene is non-negotiable. Skipping this step can lead to some seriously unpleasant problems.
Dirty clippers don't just look gross—they perform poorly and pose genuine health risks. When blades get clogged, they can't slice through hair cleanly. Instead, they snag and pull, leading to painful tugging, uneven results, and irritated skin. All that buildup also makes the motor work harder, which generates extra heat and causes premature wear and tear. In short, it kills your clippers faster.
The risks go far beyond a bad haircut. Research shows that uncleaned blades can become a hotbed for bacteria. One report found that dirty blades harbor bacteria at rates 10 times higher than clean ones, with a staggering 45% of at-home users experiencing skin irritations like folliculitis. With folliculitis impacting an estimated 12 million people worldwide each year, it's a risk not worth taking.
Key Takeaway: Cleaning isn't just about wiping away hair. It's about preventing skin infections, extending your clipper's motor life, and guaranteeing a sharper, smoother cut every single time.
To make this even easier, here’s a quick breakdown of the essentials.
This table summarizes the core cleaning tasks, how often you should do them, and why they matter. Think of it as your cheat sheet for keeping your clippers in prime condition.
| Cleaning Step | Frequency | Key Purpose |
|---|---|---|
| Brush Off Debris | After every use | Removes loose hair and skin to prevent clogs. |
| Sanitize Blades | After every use | Kills bacteria and germs to prevent skin infections. |
| Deep Clean | Every 2-4 weeks (or as needed) | Removes stubborn buildup from under the blade. |
| Oil Blades | After cleaning/sanitizing | Lubricates blades to reduce friction, heat, and wear. |
Following these simple steps consistently will make a world of difference in how your clippers perform and how long they last.
Knowing how to clean hair clippers comes down to two routines: the quick post-cut cleanup and the more involved deep clean. That quick cleanup should be automatic after every use—no excuses. The deep clean is something you'll do less often, but it's just as vital for long-term maintenance.
For any guy looking to build a solid grooming routine, integrating proper clipper care is a must. You can find more foundational grooming tips in our essential guide to hair care for men.

Before you start cleaning your clippers, you need the right gear on hand. Proper maintenance isn't complicated, but having the correct tools turns a frustrating chore into a quick, effective ritual. Putting together a dedicated clipper care kit means you're always ready for both daily upkeep and those essential deep cleans.
The good news? You don't need an entire workshop. A few key items will handle 99% of maintenance tasks, keeping your clippers hygienic and running smoothly for years. Think of this as your clipper's personal support crew, where each tool plays a critical role in its performance and lifespan.
Some items are fundamental to clipper care. Trying to get by without them is a fast track to compromising the hygiene, performance, and lifespan of your tool. These are the first things you need to gather.
Pro Tip: Never use 90% or higher isopropyl alcohol. It evaporates too quickly to kill germs effectively and can be overly harsh on the plastic parts of your clipper's housing over time.
Once you have the basics covered, a few extra items can make the cleaning process much more efficient, especially for barbers or anyone who uses their clippers frequently.
One of the best upgrades you can make is an all-in-one clipper spray. Products like Morfose Ossion Premium Barber Hair Clipper Spray are total game-changers for a quick turnaround. These 5-in-1 formulas disinfect, lubricate, clean, cool, and prevent rust all in one shot, saving you precious time between cuts. For tackling stubborn, greasy buildup during a deep clean, a powerful degreaser like the Morfose Ossion Multi-Purpose Cleaning Spray is essential for dissolving grime that a simple brush can't handle.
The single best habit you can build for your clippers isn't a big, occasional deep clean. It's the quick, consistent wipedown you do after every single haircut. Think of it like wiping down the kitchen counter after you cook—a small effort that stops a massive mess from building up later.
This five-minute ritual is your first line of defense. Making it second nature will slash the time you spend on heavy-duty cleaning and can easily add years to your clipper's life. The goal is simple: stop the buildup before it has a chance to settle in and cause problems.
First things first: safety. Before you even think about cleaning, unplug your clippers. This is non-negotiable. It completely removes the risk of the motor kicking on while your fingers are near the blades.
Once it's unplugged, pop off any attachment guards you were using. Just set them aside for a moment; we'll get to those. With the main blade exposed, you can now see exactly where all the hair and debris have gathered.
This is the most important part of the quick clean. Grab your stiff-bristled clipper brush and thoroughly sweep away all the visible hair from the blades. Don't rush this. Get the top, the sides, and right in between the teeth of the blade.
Give the clipper housing a quick brush-down, too, paying attention to the seams and vents where hair loves to hide. For a pro-level clean, gently move the blade adjustment lever (if you have one) back and forth as you brush. This shifts the cutting blade just enough to kick out trapped hairs that were otherwise hidden.
Why Brushing Matters: That leftover hair isn't just hair; it's a sponge for moisture and skin oils, creating a perfect breeding ground for bacteria. Even worse, it gets packed between the blades, throwing them out of alignment and putting a huge strain on the motor. Keeping the blades free of debris can lead to a 90% reduction in motor strain.
This principle of clearing out debris is universal for grooming tools. For tips on keeping your other essentials in top shape, check out our guide on how to clean a hair brush.
With the loose hair gone, it's time to disinfect. A quick spritz of clipper disinfectant spray or a wipe with a cloth lightly dampened with 70% isopropyl alcohol is all you need. Make sure you cover the entire surface of the blades.
This step does more than just kill germs. Most clipper sprays are multi-talented; they often contain coolants to help dissipate heat from the motor and lubricants that leave a micro-thin layer of protection against rust. If you're looking for more detailed advice on how to safely clean stainless steel blades without causing damage, that guide has some excellent tips that apply here, too.
Your attachment guards need some love, too. They collect just as much gunk as the clippers themselves, so take a second to brush them out thoroughly.
If they're looking a little grimy, you can give them a wash in warm, soapy water. Just make absolutely sure they are 100% dry before you snap them back on or toss them in a drawer. Any trapped moisture is a recipe for mildew and bacteria.
And that's it. From unplugging to putting it all away, this entire ritual takes less than five minutes, but its impact on your clipper's performance and hygiene is massive.
While that quick daily wipe-down is your first line of defense, the weekly deep clean is where the real magic happens. This is what keeps your clippers hitting hard and running smoothly for the long haul. It's time to get past the surface-level stuff and tackle that stubborn, impacted gunk that a simple brush-off just can't touch.
For any professional, this is a non-negotiable part of the routine. For home users, it's the habit that separates a decent haircut from a great one.
The process involves taking the blades off, giving the clipper's internals a thorough cleaning, and properly sanitizing everything to kill any lingering germs. It might seem like a lot at first, but once you do it a couple of times, it's second nature. The reward? Clippers that run cooler, cut cleaner, and last way, way longer.
First things first: unplug the clippers. Seriously. This is the most important safety step, so don't even think about touching a screw until that cord is out of the wall. Once you're disconnected, find a clean, well-lit spot to work.
Grab a screwdriver that fits the blade screws perfectly. Trying to force it with the wrong size is the quickest way to strip a screw head and turn a simple job into a nightmare. Gently loosen the two screws holding the blade set in place. You don't need to take them all the way out just yet—just loosen them enough to slide the blade assembly off.
As you slide the blades off, you'll see it's usually two pieces: the bigger, stationary guide blade and the smaller, moving cutter blade. Pay close attention to how they fit together, because you'll have to put them back exactly the same way.
Pro Tip: If this is your first time, pull out your phone and snap a quick picture of the blades before you fully separate them. Trust me, having that visual guide is a lifesaver when it's time to put it all back together.
With the blades off, you’re going to see it: a compacted mess of hair clippings, oil, and skin flakes hiding inside the clipper head and under the blades. This is the stuff that makes your clippers snag hair, run hot, and perform poorly.
Grab your stiff-bristled brush and get to work cleaning every nook and cranny.
For that really nasty, greasy buildup that a dry brush can't handle, a dedicated cleaning spray is your best friend. Something like the Morfose Ossion Multi-Purpose Cleaning Spray can cut right through the grime. A quick spray helps dissolve all that gunk, letting you wipe it clean with a dry cloth.
Okay, now that the physical debris is gone, it’s time to get rid of the microscopic stuff. Disinfecting is what kills the bacteria and germs that can lead to skin irritation or infections.
This is where the tools of the trade come in. You've got a couple of solid options for your sanitizing solution. Choosing the right one depends on your needs—whether you're cutting hair for your family at home or for clients in a shop.
| Disinfectant Type | Effectiveness | Best For | Application Tip |
|---|---|---|---|
| 70% Isopropyl Alcohol | Kills most bacteria, fungi, and viruses. | Home users and quick cleanups. | Highly effective and budget-friendly. Evaporates quickly. |
| Barbicide | Hospital-grade; kills bacteria, viruses, and fungi. | Professional barbers and stylists. | The industry standard. Follow dilution ratios carefully. |
| Clipper-Specific Sprays | Often a 5-in-1 (coolant, disinfectant, lubricant). | Quick sanitation between clients. | Great for on-the-fly use, but not a replacement for a deep soak. |
| White Vinegar | Mildly acidic; can kill some bacteria. | Natural cleaning enthusiasts at home. | Less potent than alcohol but a decent non-chemical option. |
No matter which you choose, only submerge the metal blades. Never, ever submerge the clipper body itself. Let the blades soak for about 5 to 10 minutes. That's plenty of time to kill the germs. Any longer, and you're just asking for rust to form on your expensive blades.
This simple flow—unplug, brush, disinfect—is the heart of good clipper care.
After the soak, take the blades out and dry them completely with a clean, lint-free cloth. Now for the step that most people rush, but it's arguably the most important: blade alignment. Get this wrong, and you're setting yourself up for nicks, cuts, and irritated skin.
Set the small cutting blade back onto the clipper's drive lever. Next, place the larger guide blade over it and start tightening the screws, but don't crank them down just yet.
You need to set the gap. For most standard clippers, you want the teeth of the top cutting blade to be set back about 1/32 to 1/16 of an inch from the front edge of the bottom guide blade. Just as important, the two blades have to be perfectly parallel. Once they're lined up, hold them steady with your thumb and tighten the screws down for good.
Don't think this is optional. A study from Spherical Insights revealed that a staggering 67% of professional barbers said poor maintenance was the top reason they had to replace their clippers within a year. Taking a few extra minutes for a proper deep clean protects your investment and ensures your tools are always ready to deliver a perfect cut.
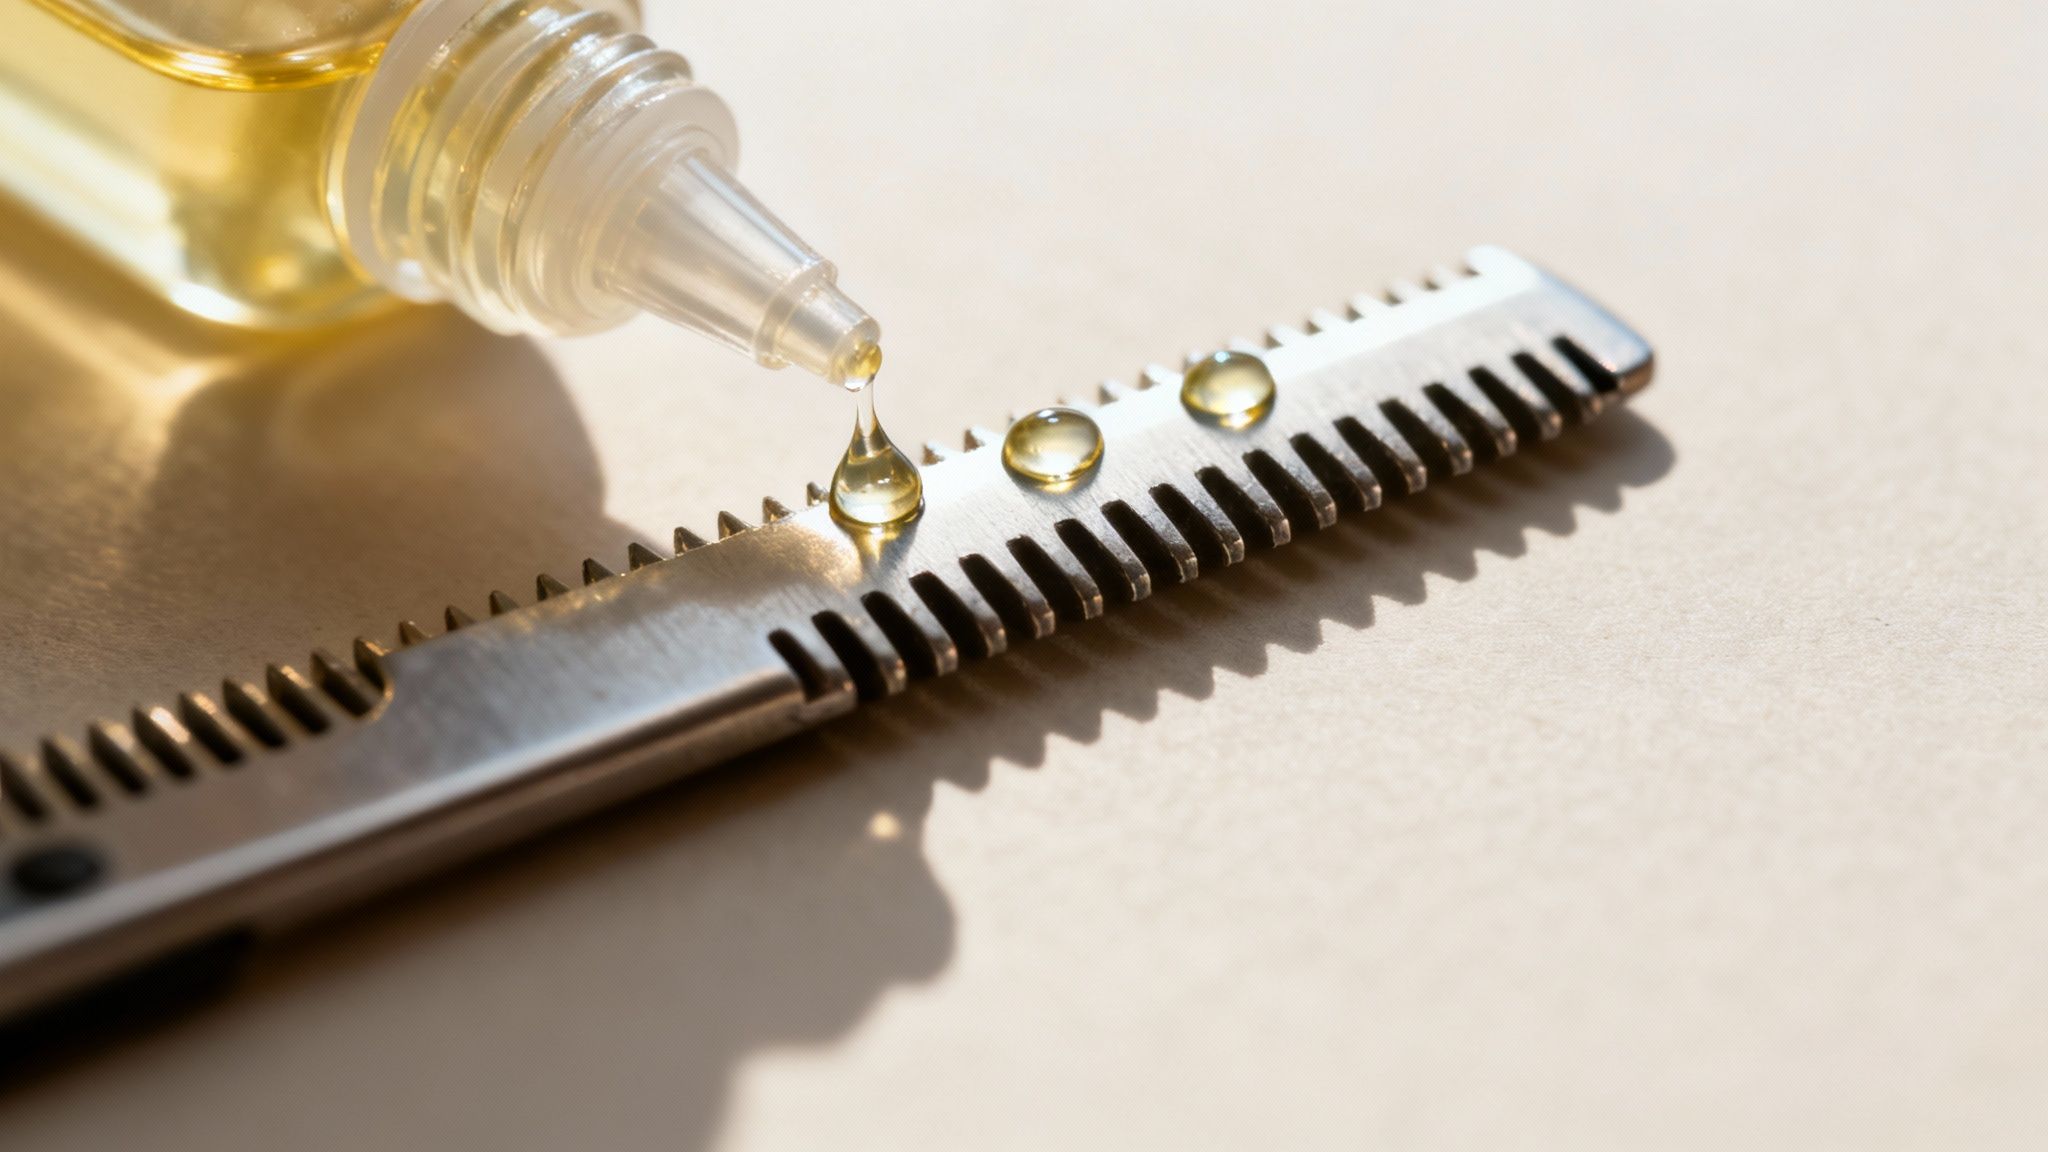
If there’s one habit you build from reading this guide, let it be this: oil is everything. Seriously. After a thorough cleaning and disinfecting session, oiling your blades isn't just a "nice-to-have." It's the single most important step for keeping your clippers running smoothly for years.
Think about what’s happening. You’re running two pieces of metal against each other thousands of times a minute. Without lubrication, that friction creates a ton of problems. First, it generates serious heat, making the blades uncomfortable on the scalp and potentially causing irritation. It also dulls your blades like you wouldn't believe, turning a precision tool into a hair-pulling nightmare. All that resistance puts a massive strain on the clipper’s motor, making it run louder, weaker, and eventually, causing it to burn out completely.
The good news? Oiling is incredibly fast—we’re talking less than 30 seconds. The trick is just to do it religiously after every single cleaning.
Here’s the foolproof method I've used for years:
This tiny ritual is a game-changer. It slashes friction, keeps the blades cool to the touch, and helps them stay sharp for months longer than they otherwise would.
I’ve seen people reach for whatever oil is handy, and it’s a huge mistake. Household oils are completely wrong for high-speed blades.
Common Myth Debunked: Never use alternatives like WD-40, cooking oil, or motor oil on your clippers. These oils are far too thick. They attract dust and hair like a magnet, eventually gumming up the blades and creating a sticky mess that puts more strain on the motor.
Dedicated clipper oil is a special high-grade, low-viscosity mineral oil formulated specifically for this job. It lubricates the metal without being sticky, protecting your blades and motor just the way the manufacturer intended.
The impact is massive. For a busy pro doing maybe 50 haircuts daily, applying just a few drops and running the motor for 15 seconds can cut friction by up to 50%. With the salon industry growing so fast, tool maintenance has become non-negotiable, especially when you consider that health studies link uncleaned tools to 14% of infection rates. If you're interested in the bigger picture, you can learn more about how proper maintenance supports market growth from this global market research report.
Keeping your clippers in perfect shape is the first step to a great haircut, but the job isn't done when you turn them off. The right products are what elevate a simple trim into a sharp, put-together style. This is where you go from good tool maintenance to great hair care.
Think of a fresh cut as the perfect canvas. Your clippers did the heavy lifting, and now it's time to bring your new look to life by adding texture, definition, and hold. A clean cut deserves to be shown off.
To make those clean lines and fresh texture really pop, you need a product that offers control without making your hair feel like a helmet. A good styling wax lets you sculpt and shape your hair, giving it that fresh-from-the-barber look without any stiffness or greasy residue.
We always reach for Morfose Ossion Beard & Hair Styling Wax to lock in a new cut. Its formula is just right for adding definition and a healthy shine right after a trim. It doesn't matter if you're aiming for a classic, clean-cut look or something more modern and textured—this wax gives you the control you need to finish the job.
Grooming Tip: A little trick of the trade is to warm a small dab of wax between your palms before you apply it. This makes it way more pliable and helps it spread evenly, so you avoid clumps and get a much more natural-looking hold.
Styling is what people see, but true hair health starts at the scalp. Just as clean clippers prevent skin irritation, the right shampoo makes sure the foundation is healthy, nourished, and ready for strong growth. Try working Morfose Herbal Anti Hair Loss Shampoo into your regular wash routine. Its formula is specifically designed to support scalp health and strengthen hair right from the root. And if you want to take your whole routine up a notch, check out our full line of beard care products to keep every part of your look sharp.
Even with the best routine, you're bound to have questions. Getting the little details right is what separates a decent haircut from a great one, and it can dramatically extend the life of your clippers. I get asked these all the time, so let's clear things up.
Think of this as your go-to guide for those "am I doing this right?" moments.
This really boils down to how you're using them, but the golden rule is consistency. You want to stop hair, skin cells, and product from building up in the first place.
This is a big one, and it’s a risky move. Generally, the answer is no. While some premium, detachable stainless steel blades are made to be rinsed, you must never get the clipper body wet. Water will find its way into the motor and circuitry, causing rust and electrical damage that you can't undo.
Always, and I mean always, check your manufacturer’s guide first. If it says you can rinse the blades, they have to be dried immediately and perfectly. Even a hint of moisture left behind can start the rusting process, which will ruin them for good. As soon as they're dry, oil them to protect the metal and displace any lingering moisture.
Skipping the oil is the fastest way to kill a perfectly good set of clippers. It is not an optional step. The blades are two pieces of metal moving against each other at incredibly high speeds. Without lubrication, that friction creates a ton of heat.
This heat not only makes the cut uncomfortable for the person in the chair but also dulls your blades at an alarming rate. Worse, it puts a massive strain on the motor, which can lead to it burning out entirely. Pretty soon, your clippers will start snagging and pulling hair instead of slicing through it—a dead giveaway of a dry, neglected tool.
Ah, the classic hair-pulling problem. It’s your clippers screaming for help, and it almost always points to one of three things.
Troubleshooting Checklist: When your clippers start pulling, the first and most common culprit is that the blades are clogged with hair and grime. The second is that the blades have become dull from friction, and the third is that they are misaligned.
Your first move should always be to stop, do a thorough deep clean, and apply a fresh coat of oil. If that doesn't fix it, your next step is to carefully check the blade alignment. If the problem persists after you’ve cleaned, oiled, and aligned them, it's a sure sign your blades need to be sharpened or replaced entirely.
Keeping your tools in top shape is the foundation of any great look. At Morfose, we believe that professional-grade grooming extends from your clippers to your styling products. By maintaining your tools properly and using high-quality hair care, you ensure every cut looks its best.
