Flash Sale 70% Off
Give customers details about the banner image(s) or content on the template.
Are You One of Our Winners?

Cleaning your hair brushes is about more than just yanking out tangled strands. To get your tools truly clean, you need a process that removes the stubborn buildup of oils, dead skin cells, and product gunk that accumulates over time. A dirty brush can drag all that grime back onto your clean hair, making it look greasy and weighing it down. Luckily, the cleaning process is simple: remove the hair, soak the brush in warm water with a gentle cleanser to dissolve buildup, scrub away any remaining residue, and let it air-dry completely. This guide will walk you through every step.

That brush you run through your hair every single day is hiding a lot more than just a few stray strands. Over time, it becomes a hotspot for a pretty gross mix of dead skin cells, natural scalp oils (sebum), dust, and all that hairspray, gel, and styling cream you use.
This buildup doesn't just look bad; it creates the perfect breeding ground for bacteria and yeast.
So, every time you use that dirty brush, you're just spreading all that old gunk back onto your clean hair and scalp. This can clog up your follicles, make your hair look greasy way faster, and totally weigh it down.
The fallout from a dirty brush goes way beyond just dull, oily hair. That accumulation of bacteria and fungi can directly lead to an irritated, itchy scalp and can make conditions like dandruff so much worse.
It's a surprisingly common problem. Neglecting your hair tools can affect up to 80% of people who deal with scalp issues without ever connecting the dots back to their dirty brush. If this sounds familiar, you might want to check out our guide on dealing with dandruff and effective remedies.
Understanding this connection is the first step toward preventing these common hair frustrations. Regular cleaning isn’t just about being tidy; it's a non-negotiable part of a healthy hair routine.
By simply cleaning your brushes once a week, you can dramatically cut down on the oil transfer that makes hair greasy and reduce the microbes that cause dandruff.
People are starting to catch on. The growing awareness around hair tool hygiene is a big reason why the global hair brush market is set to expand so much in the next few years. We're all realizing that clean tools are the foundation of healthy hair. A clean brush makes sure your hair products can actually do their job on a clean slate, instead of fighting through a layer of old residue.
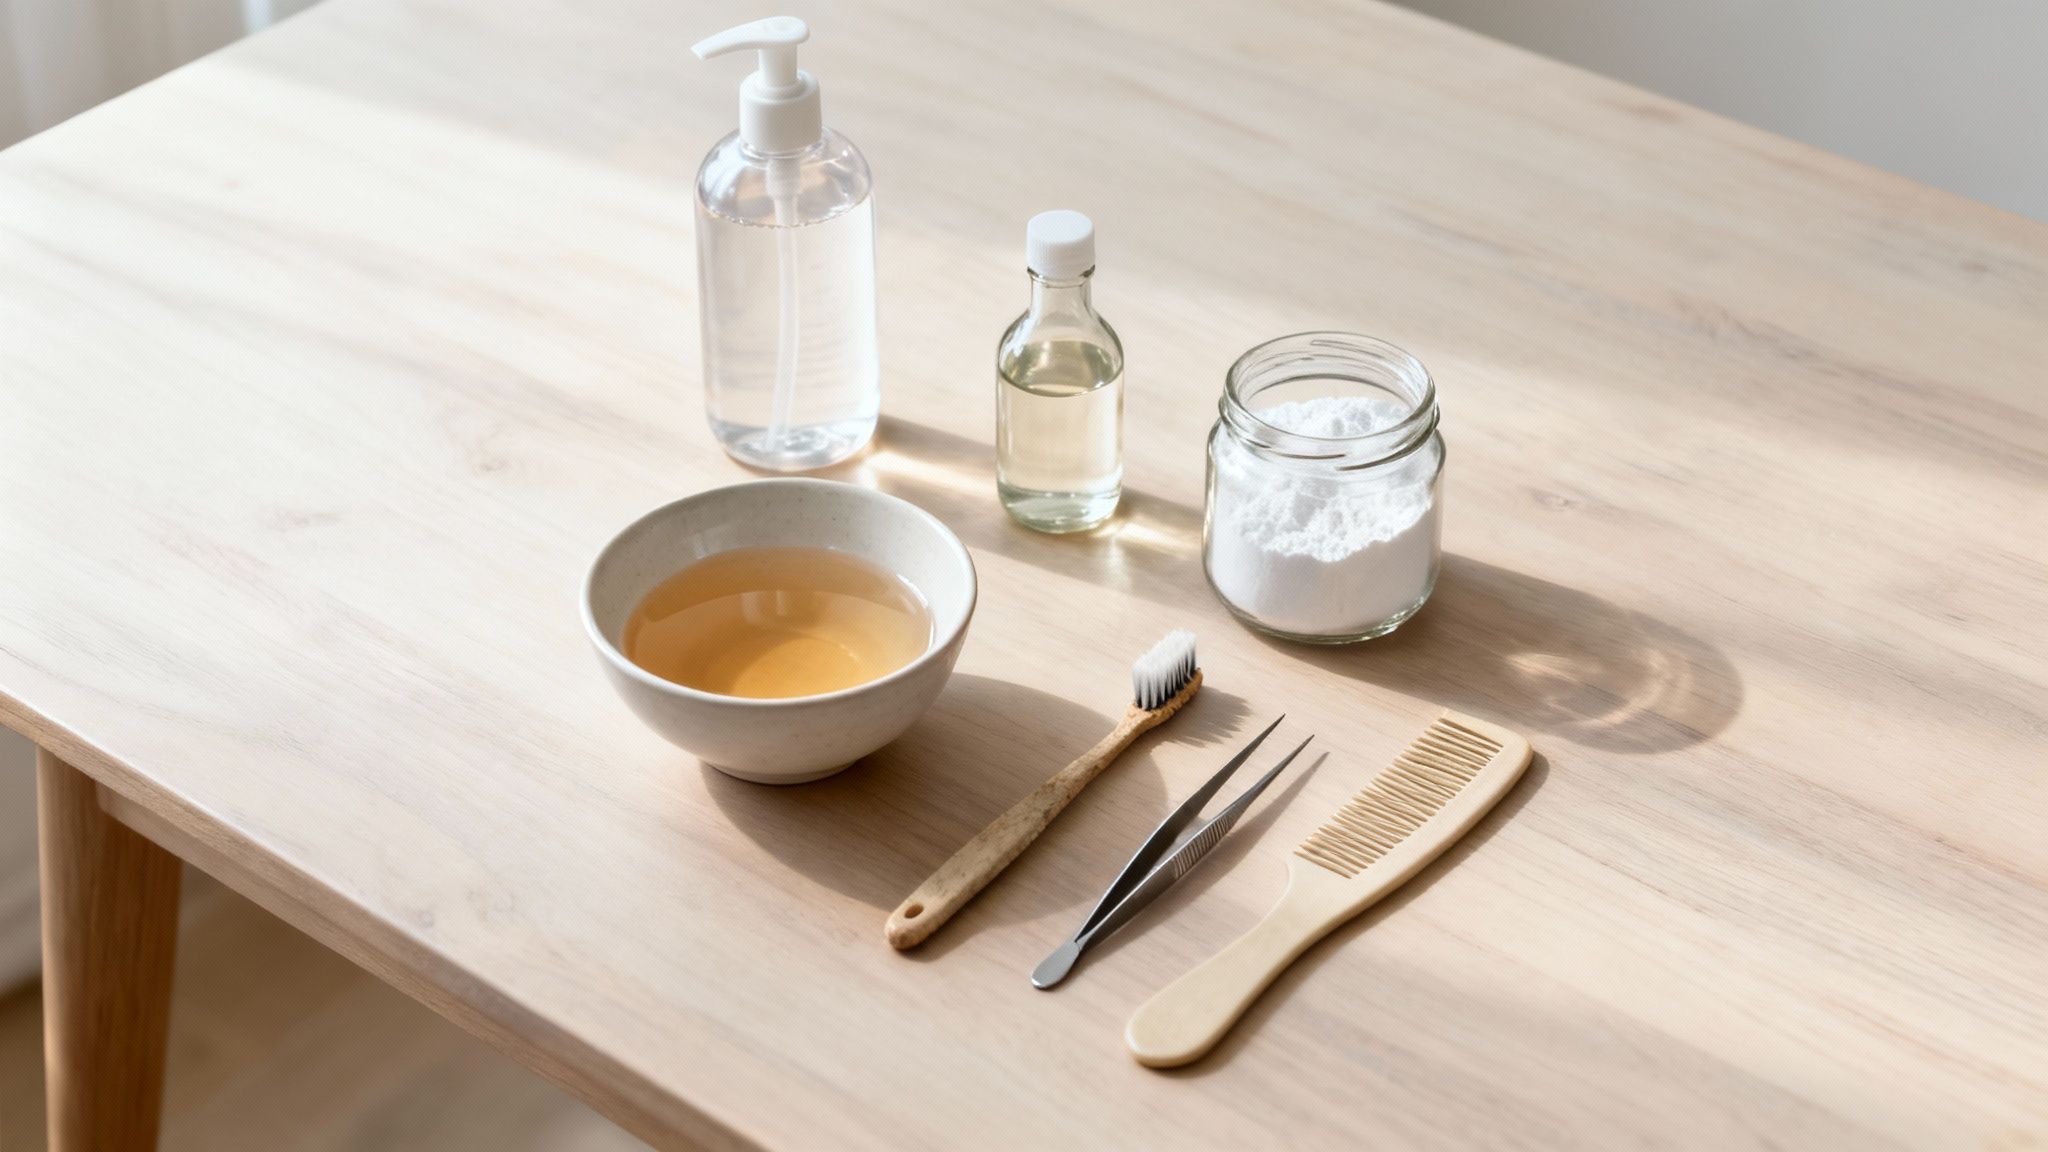
Before you can get into the satisfying work of deep-cleaning your brushes, you'll want to get all your supplies in order. Having a dedicated toolkit ready to go makes the whole process so much faster and more efficient.
The good news? You probably have most of what you need already sitting around your house. Think of this as your pre-cleaning checklist. You’ll need a few items to physically remove the gunk and some options for a cleaning solution to dissolve the rest.
First things first, you'll need a way to get all that trapped hair out. This is easily the most important first step, and having the right tool makes a world of difference.
Once you have these tools on hand, you’re ready to mix up a cleaning solution that will melt away all that unwanted residue.
The right cleaning agent is key—it needs to break down oils and product buildup without being so harsh that it damages your tools. For a powerful clean on handles and non-porous surfaces, a product like Morfose Ossion Multi-Purpose Cleaning Spray can work wonders for that final sanitizing wipe-down.
For the soak itself, you can turn to some common household heroes:
Clarifying Shampoo: Your best bet for dissolving oils and stubborn styling product residue. Just a small squirt into a bowl of warm water is all it takes.
White Vinegar: This is a fantastic natural disinfectant. It’s great for killing bacteria and also helps break down any mineral buildup you might have from hard water.
Baking Soda: Excellent for getting rid of any funky smells, baking soda also provides a gentle scrubbing action to help lift away that really stuck-on gunk.
Now for the satisfying part—taking that gunky, hair-clogged brush and making it look brand new again. This deep cleaning method is straightforward, seriously effective, and works for most types of brushes you own. Let's walk through the process that will dissolve all that buildup and sanitize your tools for healthier hair and scalp.
First thing's first: you absolutely have to remove every last strand of trapped hair. I can't stress this enough. If you skip this, your cleaning solution won't be able to reach the base of the bristles or the cushion, which is exactly where all the gross stuff hides.
Once all the loose hair is gone, it’s time for a proper wash. This involves a good soak to break down oils and product residue, followed by a gentle scrub to get rid of anything left behind.
Mix Up Your Cleaning Soak: Grab a bowl (or just use your sink) and fill it with warm water. Avoid super hot water, as it can damage delicate bristles or even warp some plastics. Add a few drops of a gentle clarifying shampoo or even a mild dish soap, and give it a good swish to get some suds going.
Soak Your Brush (Carefully!): For plastic or metal brushes, go ahead and submerge the head of the brush in your soapy water. Let it hang out in there for about 15-20 minutes. This gives the solution plenty of time to work its magic on stubborn product buildup, natural oils, and dead skin cells.
Scrub Away the Grime: After the soak, grab an old toothbrush or a small cleaning brush to gently scrub the bristles and the base. Pay close attention to where the bristles meet the pad—that’s where the most stubborn gunk loves to accumulate.
A deep clean like this is crucial for preventing old product and bacteria from getting back onto your clean hair, which is a major culprit behind breakage. You can find more tips on how to reduce hair breakage and split ends in our other guide.
If you want a truly deep, sanitizing clean, you can kick things up a notch with a more powerful solution. And you should. Research has shown that a single dirty comb can be home to over 1 million bacteria colonies after just one month of use. Yikes.
To really tackle that, you can create an incredibly effective cleaning bath. Fill a basin with hot water, add 1/4 cup of ammonia-free dish soap, and stir in 2 tablespoons of baking soda. This powerful combo has been shown to eliminate 99.9% of harmful bacteria like E. coli and staph from bristles.
Let your tools soak in this mixture for 20-45 minutes. Afterwards, use a small tool to clear out any blocked vents on your brushes, then give them a thorough rinse. If you're curious why this matters so much, you can read more about the importance of hair tool hygiene in the growing market.
How you rinse and dry your brush is just as important as how you wash it. If you don't do it right, you can end up with soap residue, water damage, or even mold—especially in those squishy, cushioned brushes.
Rinse Thoroughly: Hold the brush head under cool, running water until you don't see any more soap bubbles. If your brush has a cushioned pad, give it a gentle squeeze to push out any water that got trapped inside.
Shake and Dry: Give the brush a few good shakes over the sink to get rid of excess water. Then, lay it bristle-side down on a clean, dry towel. Make sure it's in a spot with good air circulation.
Drying it bristle-side down is the key takeaway here. This position allows all the water to drain away from the pad and handle, preventing moisture from getting trapped inside where it can cause fungal growth. Just let it air dry completely, which might take a few hours or even overnight. And whatever you do, don't use a hairdryer—the intense heat can easily melt plastic bristles and ruin your brush.
You wouldn't wash a silk shirt the same way you wash a pair of jeans, right? The same logic applies to your hair brushes. Using a one-size-fits-all cleaning method is a fast track to ruining your favorite tools. What works for a tough plastic paddle brush can easily warp a wooden handle or wreck a delicate boar-bristle brush.
To keep your brushes in top shape, you have to tailor your cleaning approach to the material. This isn’t just about getting them clean; it’s about extending their lifespan and making sure they don’t get warped, cracked, or damaged in the process.
Let's look at the basic steps, which we can then tweak for each specific brush type.

This simple flow—Remove Hair, Soak, Scrub, and Dry—is our foundation. Now, let’s see how it changes based on the brush you’re holding.
Good news: solid plastic and metal brushes are by far the easiest to clean. Because they’re non-porous and super durable, they can handle a deep soak without any risk.
You can fully submerge these brushes in warm, soapy water for a good 15-20 minutes to let all that gunk and product buildup dissolve. Some are even dishwasher-safe—that’s about 20% of the market—and can be sanitized on the top rack. A cycle at 150°F is more than hot enough to kill off any lurking germs.
Brushes with natural bristles, like those made from boar hair, need a much softer approach. Think of these bristles like your own hair—they're porous and can be easily damaged by harsh soaps or sitting in water for too long.
When it comes to wooden brushes and combs, water is the enemy. Never, ever fully submerge a wooden brush. It will soak up water like a sponge, causing the wood to swell, crack, or warp as it dries, which will completely ruin it.
Instead, grab an old toothbrush, dip it into your soapy water, and use it to scrub between the bristles and across the base. For the wooden handle, a quick wipe with a damp cloth is all it takes. Wood handles make up roughly 10% of the premium brush market, and simply wiping them down instead of soaking them can easily double their lifespan. To learn more about the latest trends in hair tool hygiene, you can explore insights from the growing hair brush industry.
Key Takeaway: Never submerge a wooden brush or comb in water. A quick dip of the bristles is the absolute most it can handle. Always wipe the handle clean with a separate cloth.
The biggest risk with cushioned paddle brushes is water getting trapped inside the rubber base. That’s a perfect breeding ground for mold and mildew—something you definitely don't want anywhere near your scalp.
After a very brief, bristles-down soak, gently squeeze the cushion pad to press out any water that might have snuck inside. When you set it out to dry, always place it bristle-side down on a clean towel. Gravity will do the work, ensuring any leftover moisture drains out completely, keeping your brush fresh and safe to use. Knowing which tool is right for the job is half the battle; for more on this, check out our guide on exploring different hair comb types and their best uses.
Now that your brushes are squeaky clean, let's talk about the real payoff. Using pristine tools isn't just about hygiene; it’s about making sure your hair gets the full benefit of every single product in your routine.
Think of your freshly cleaned brush as a perfect, blank canvas. When it's finally free of all that old oil, product buildup, and daily grime, the serums, sprays, and conditioners you love can actually do their jobs properly. This is where you’ll see a massive difference in your hair's health and shine.
It sounds obvious, but using a dirty brush right after applying high-quality products is like taking one step forward and two steps back. That gunk hiding in the bristles can seriously interfere with how ingredients are distributed, essentially watering down their benefits before they even get to your hair and scalp.
A clean brush, on the other hand, guarantees a direct, uncontaminated application every time.
For instance, if you’re using a targeted treatment like Morfose Herbal Anti Hair Loss Shampoo, a clean brush helps ensure you're delivering those active ingredients right to a clean scalp. This maximizes the formula's power to nourish follicles without having to fight through a layer of old residue first.
The same goes for styling. After washing, a clean comb allows a product like the Morfose Two Phase Keratin Conditioner to be distributed evenly from root to tip. It detangles and conditions without dragging old oils back through your hair, meaning every strand gets the full protective benefit.
A truly effective routine is more than just a collection of good products; it’s about how everything works together in harmony. Your tools are a huge part of that equation. By pairing the right products with clean brushes and combs, you ensure you’re building on your results, not undoing them.
A clean brush doesn’t just prevent problems like scalp irritation—it actively enhances the performance of your entire hair care regimen, making every product you invest in work harder for you.
To really nail your routine, you first need to understand what your hair truly needs. You can learn more about this by tailoring your hair care products to your hair type in our detailed guide.
Combining that knowledge with pristine tools is the secret to unlocking consistently healthy, beautiful hair. It all starts with a clean foundation.
Even when you've got a solid cleaning routine down, a few questions always seem to pop up. Let's tackle some of the most common ones I hear about keeping hair tools in top shape. Getting these details right is the final piece of the puzzle for mastering your brush and comb care.
This is a great question, and the honest answer is: it depends. The ideal schedule really comes down to your hair type and how much styling product you use. There’s no single rule that fits everyone, but we can work with some solid guidelines.
For a quick clean—just pulling out the trapped hair—you should be doing this every couple of days. It takes seconds and stops a bigger, more tangled mess from forming.
When it comes to a deep wash, aim for at least once a month. But, and this is a big but, if you have an oily scalp or you're a fan of hairspray, mousse, or dry shampoo, you'll want to do a deep clean every two weeks. Otherwise, all that residue just gets brushed right back onto your clean hair.
While it’s tempting to reach for something strong like isopropyl alcohol for a quick disinfect, it can be way too harsh for most of your go-to hair tools. You have to know when it’s okay and when you need a gentler approach.
Alcohol is generally fine for solid plastic or metal combs and brushes—things without any porous parts. A quick wipe can sanitize them effectively.
But please, avoid using alcohol on natural bristles like boar bristle and on any wooden handles. Alcohol will strip the natural oils right out of the bristles, leaving them dry and brittle. It can also ruin the finish on a wooden handle, causing it to crack over time.
For most brushes, especially your favorites with delicate materials, just stick to a soak with a gentle shampoo or a diluted white vinegar solution. It's much safer and still gets the job done beautifully.
As much as we might love a particular brush, it won't last forever. A worn-out brush isn't just an eyesore; it's less effective and can actually start damaging your hair. Knowing when to say goodbye is key.
Keep an eye out for these tell-tale signs that it’s time for a replacement:
Think of a fresh, clean brush as an investment in your hair's health. It ensures every single styling session starts off right, with tools that are actually helping you reach your hair goals.
At Morfose, we believe that the foundation of great hair is a combination of clean tools and high-quality products. Explore our collections today to find the perfect solutions to nourish, protect, and style your hair. Find your new routine at https://themorfose.com.
