Flash Sale 70% Off
Give customers details about the banner image(s) or content on the template.
Are You One of Our Winners?

Learning how to braid your own hair is a game-changing skill that unlocks endless styling possibilities. While it might seem intimidating at first, mastering the basics is easier than you think. With a little practice, you can go from a simple three-strand plait to elegant French and Dutch braids, creating beautiful looks that protect your hair.
This guide will walk you through the essential steps, from prepping your hair for success to mastering the most popular braiding techniques.
Before you weave a single strand, proper preparation is key. Great braids start with well-prepped hair. Skipping this step is like building a house on a shaky foundation—it simply won't last. The secret to smooth, secure, and polished braids lies in how you treat your hair before you begin.
Starting with clean, detangled hair is non-negotiable. Many find that second-day hair offers better grip due to natural oils, but it must be completely free of knots for a sleek finish. Braiding through tangles will only lead to lumps, bumps, and unnecessary breakage.
To set yourself up for braiding success, focus on three key steps: detangling, moisturizing, and sectioning. Getting these right will help you create a style that not only looks amazing but also protects your hair.
Proper preparation is the difference between a braid that falls apart in an hour and a style that looks flawless all day. Taking ten extra minutes to detangle and moisturize your hair will save you from frizz, flyaways, and potential damage.
By creating the perfect canvas, you ensure your protective style actually protects your hair. If you need more help, learn more about how to use hair detangler to get the job done right. This initial prep work makes the entire braiding process smoother and more enjoyable.
The simple three-strand braid is the foundation for almost every other braided style. Think of it as learning your scales before playing a symphony. Mastering this basic movement builds the muscle memory needed for more complex styles like French or Dutch braids.
Once you nail this technique, everything else becomes easier. This braid is all about rhythm and consistency. The goal is a uniform plait where each section is the same size and tightness. It might feel clumsy at first, but with practice, your hands will learn the motion automatically.
First, gather the hair you want to braid. A helpful trick for beginners is to start with a side ponytail so you can watch your progress in a mirror. This makes it easier to see what you're doing.
Next, divide the ponytail into three equal sections. Mentally label them left, middle, and right. The entire braid is a simple sequence of crossing the outer strands over the middle one.
Pro Tip: The key to a neat braid is maintaining even tension. Don’t pull so tight that it’s uncomfortable, but keep a firm, consistent grip. If your hands get tired, pause and readjust without letting go of the strands.
It's normal for your first few attempts to look a bit uneven. Lopsided shapes and messy sections are common but easy to fix.
If your braid looks thicker on one side, your initial sections weren't equal. Re-divide your hair, ensuring each strand is the same size.
If the braid gets frizzy as you work your way down, a small amount of styling product can help. For extra control, our guide on how to use styling gel to create the perfect hairstyle offers great tips for taming flyaways.
Once you reach the last inch or two, secure the braid with a hair elastic. Don't be afraid to undo it and try again. Practice is the only way to perfect how to braid your own hair, and the classic three-strand braid is the best place to start.
Once you've mastered the classic three-strand braid, you're ready for the French braid. This timeless style weaves hair close to the scalp for an intricate look that’s perfect for any occasion, from a gym session to a formal event.
It may look complicated, but a French braid uses the same "over the middle" motion you already know. The only new element is adding hair as you go.
The trick is learning to smoothly grab and incorporate new sections of hair. It feels awkward at first, especially when you can't see the back of your head. But with practice, your fingers will build muscle memory, and you'll be creating tight, secure braids that last all day.
Start with completely tangle-free hair. Grab a small section of hair at your hairline or the crown of your head, wherever you want the braid to begin. Split it into three equal strands, just like a standard braid.
To anchor your braid, start with one or two stitches of a regular braid:
This step locks in the top of your braid. Now, you can start adding hair.
Before crossing the right strand over the middle again, use your finger to gather a small, new section of loose hair from the right side. Join it with the existing right strand to create one thicker piece. Now, cross this combined strand over the middle.
Repeat on the other side. Before crossing the left strand, pick up a new section of loose hair from the left side. Add it to your current left strand, then cross that entire section over the middle. Continue this pattern—add hair, cross over—all the way down your head.
The secret to a clean-looking French braid is keeping your sections neat. Try to grab similar-sized pieces of hair each time. This consistency creates a polished, uniform pattern and prevents bumps.
As you braid, maintaining even tension is crucial for a style that stays put. If you're struggling with flyaways around your hairline, our guide on how to tame unruly baby hairs and flyaways offers helpful tips for a sleek finish.
This visual guide breaks down the core movement of braiding into three simple stages sectioning, crossing, and securing the hair.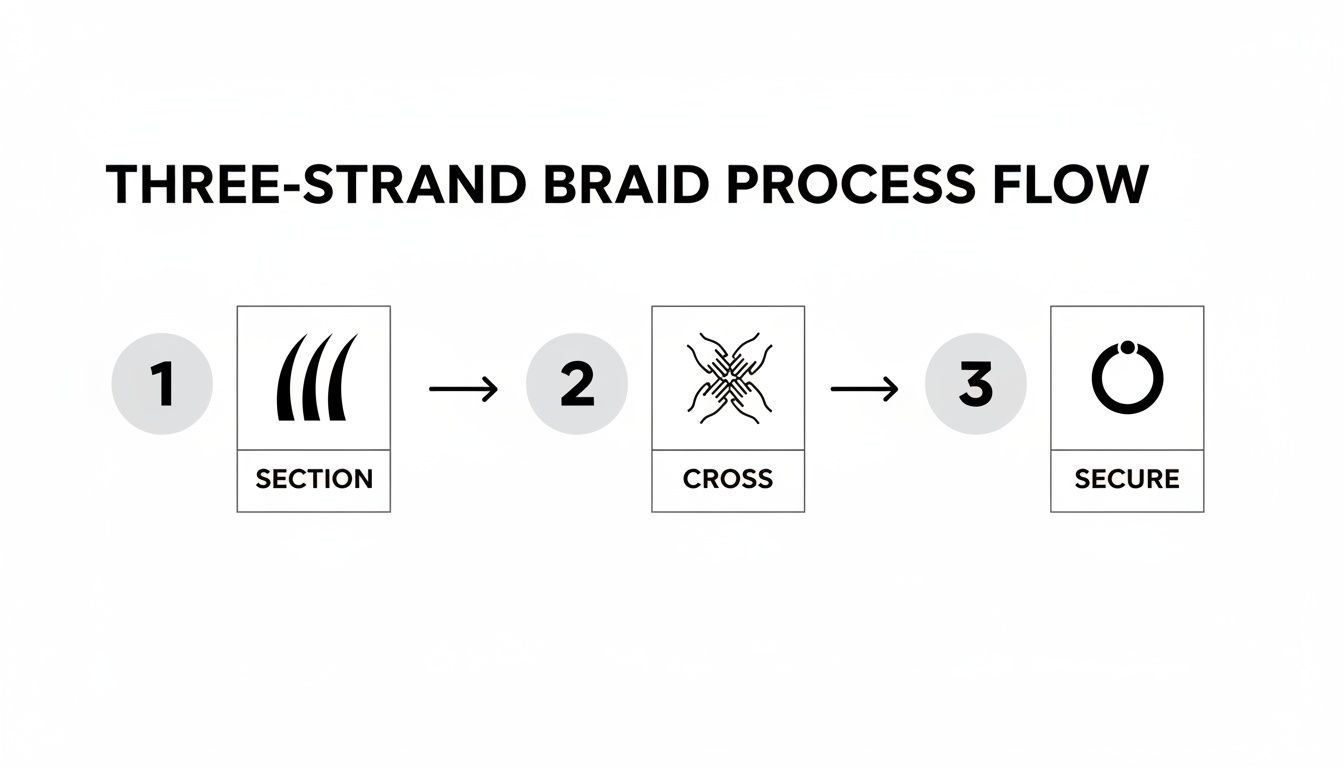
This process shows that whether it's a basic braid or a French braid, the fundamental actions of dividing and weaving the hair remain the same.
Once you’ve gathered all the loose hair at the nape of your neck, finish the length with a classic three-strand braid and secure it with a hair tie.
Don't be discouraged if your first attempts are a bit messy. French braiding your own hair is a skill that takes practice, but once you nail it, you'll have a whole new world of styles to explore.
If the French braid is classic elegance, the Dutch braid is its bold, edgy cousin. Often called a "reverse French braid" or an "inside-out braid," it creates a stunning 3D plait that sits on top of your hair for a statement-making look.
The secret behind its standout appearance is simple: it just flips the French braid technique.
The only difference is the direction you weave the strands. Instead of crossing the outer sections over the middle, you’ll cross them under. This small change is what gives the Dutch braid its signature "pop," creating a raised braid that stands out from the scalp. It's the go-to for fierce styles like boxer braids.
Ready to try it? The process starts just like a French braid. Take a section of hair from your hairline and divide it into three equal strands.
Here’s where the magic happens:
Continue this pattern—adding hair and crossing under—down your head. Once you run out of loose hair, finish with a standard three-strand braid and tie it off. It’s no surprise this style is so popular; in Europe, fashion trends have boosted braiding by 28% since 2020. You can read the full research on the growing hair braiding market on industryresearch.biz.
Want to make your Dutch braid look even fuller? The "pancaking" technique is your best friend.
Once your braid is secured, gently pull on the outer loops of each woven section. Start at the top and work your way down, tugging horizontally to widen the braid. This simple trick can instantly double the volume, giving it a soft, romantic, or powerfully thick appearance.
This is the perfect way to add texture, especially if you have fine hair. If you love this voluminous look, check out our guide on creating effortless boho braids for more style inspiration.
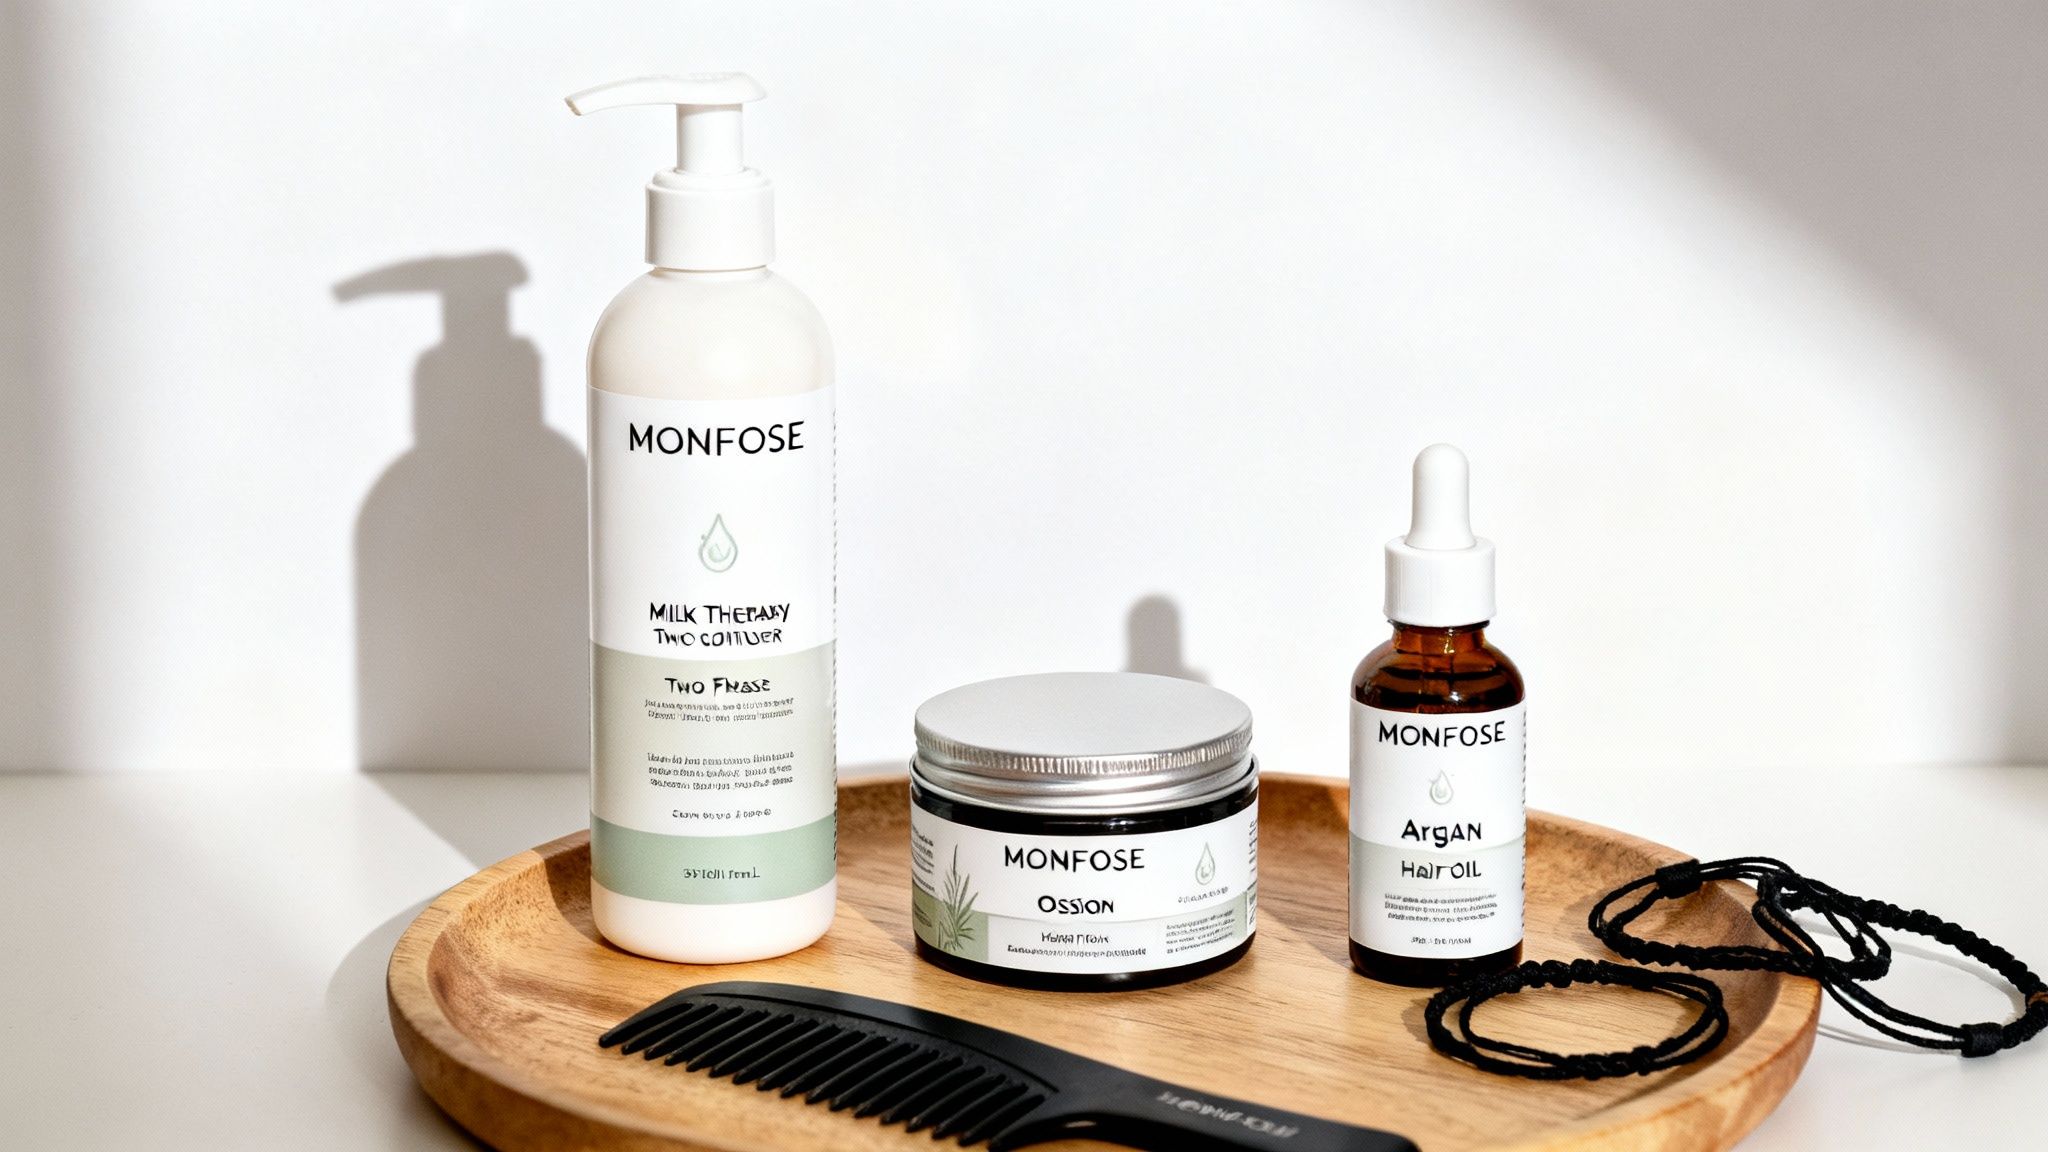
The secret to braids that look amazing and last is having the right products. A great braid starts with well-prepped hair, and the right toolkit makes the difference between a decent braid and a polished, long-lasting style.
Think of your braiding skill as the artistry and your products as the high-quality tools. They provide the grip, smoothness, and protection needed to turn a simple plait into a durable, head-turning look. Without them, even the best technique can fall victim to frizz in just a few hours.
To get a sleek, professional finish, you need products that solve common braiding problems. From detangling to adding shine, the right formulas will elevate your results. Before you start, make sure your toolkit includes a quality detangling hair brush set to get your hair smooth and knot-free.
For Detangling and Protection: Start with Morfose Milk Therapy Two Phase Conditioner. A few spritzes on damp or dry hair instantly melt away knots, making detangling gentle and damage-free. Its milk proteins and amino acids also create a protective shield, which is a lifesaver for fragile strands.
For Grip and a Smooth Finish: To tame flyaways and get a sleek look, use the Morfose Ossion Hair Styling Wax. A small amount warmed between your fingertips provides enough grip to keep your sections clean and defined without feeling sticky or stiff.
For Shine and Frizz Control: Once your braid is complete, lock in your work with a few drops of Morfose Argan Hair Serum. This lightweight oil seals the hair cuticle, fights humidity-induced frizz, and adds a beautiful, healthy-looking shine that makes your braid pop.
Using the right products at each stage is crucial. Here’s a quick guide to building your go-to Morfose braiding kit.
| Braiding Stage | Recommended Morfose Product | Key Benefit |
|---|---|---|
| Prep & Detangle | Milk Therapy Two Phase Conditioner | Melts away knots and protects fragile strands |
| Sectioning & Braiding | Ossion Hair Styling Wax | Provides gentle grip for clean sections and tames flyaways |
| Finishing & Sealing | Argan Hair Serum | Adds brilliant shine and locks out frizz for a lasting style |
Using these products together ensures your hair is not only styled beautifully but also cared for from start to finish.
Braiding has become a massive trend reflecting a move towards DIY protective styling. The global hair braiding market was valued at USD 529.3 million in 2022 and is projected to grow, showing how many people are learning how to braid your own hair.
This trend makes sense. A well-executed braid can reduce daily wear and tear. In fact, braiding can decrease breakage by up to 40% when done correctly on nourished hair. You can learn more about the growing hair braiding market and its trends.
For more tips on tools, read our guide on exploring different hair comb types.
You've spent time and effort getting your braids just right. The last thing you want is for your hard work to become a frizzy mess in a few hours.
The secret to making your style last for days is nighttime protection and smart morning touch-ups. These simple tricks will preserve your style, save you time, and reduce daily stress on your hair.
The number one enemy of a long-lasting braid is friction, especially while you sleep. Tossing and turning against a cotton pillowcase roughs up your hair’s cuticle, leading to flyaways and frizz.
The single most effective thing you can do is protect your hair while you sleep. This one change makes a huge difference.
Switch to Silk or Satin: A silk or satin pillowcase is a game-changer. Its smooth surface allows your braids to glide without snagging, which significantly reduces frizz.
Wear a Bonnet or Scarf: For even more protection, wrap your braids in a satin scarf or tuck them into a bonnet before bed. This creates a secure barrier that holds the style in place and minimizes friction.
Even with the best protection, your braids might need a quick refresh in the morning. Gently smooth down any new flyaways with a tiny dab of a light-hold product to revive your style without re-braiding.
For longer-term protective styles, keeping your scalp healthy is crucial. Gently cleanse your scalp with a cloth and a bit of dry shampoo or a dedicated scalp cleanser to prevent buildup without disturbing the braids.
Even with a perfect tutorial, you might run into some challenges when learning how to braid your own hair. Here are answers to some of the most common questions.
The battle against frizz is won before you start braiding. Ensure your hair is well-moisturized with a leave-in conditioner. While braiding, rub a tiny bit of styling wax between your fingers for better grip and to tame flyaways. Always sleep with a silk or satin scarf or pillowcase to reduce friction overnight.
The dreaded "braider's arm" is real! When you're starting out, you tend to tense up and hold your arms in an awkward position. The solution is to take breaks. Drop your arms and shake them out. Try sitting at a table or counter and propping your elbows up for support. As you build muscle memory, you'll get faster and more relaxed.
Every expert was once a beginner. Don't get discouraged if your first few attempts are wobbly. Practice is the only way to build the muscle memory needed for flawless braids.
Don't panic and pull the whole thing out! Most mistakes are fixable. If you have a small bump or a stray hair, use the end of a rat-tail comb to gently tuck it back into place. If a section is too loose, un-braid back to that spot and fix it. It's much less frustrating than starting over.
Mastering how to braid your own hair is a rewarding journey that adds incredible versatility to your styling routine. With patience, practice, and the right products, you'll be creating beautiful, long-lasting braids in no time.
Ready to create braids that look incredible and keep your hair healthy? Explore the Morfose collection for all your styling and hair care needs at https://themorfose.com.
