Flash Sale 70% Off
Give customers details about the banner image(s) or content on the template.
Are You One of Our Winners?

Moisturizing low porosity hair isn't about slathering on the thickest creams you can find. The real secret is a strategic combination of lightweight, water-based products and a little bit of gentle heat or steam. This tag-team approach coaxes open the hair's tightly-bound cuticle, letting all that wonderful moisture sink deep into the hair shaft instead of just sitting on top.
Have you ever spent good money on a rich, decadent hair butter, only to have it sit on your hair like a greasy, waxy film? If so, you've met the classic challenge of low porosity hair. It’s not that your hair is being difficult on purpose—it’s all about its physical structure.
Imagine the outer layer of your hair, the cuticle, as a roof with perfectly sealed shingles. On low porosity hair, those shingles are packed down so tightly that there are almost no gaps for water or products to get inside. This is exactly why your hair seems to take forever to get drenched in the shower and, on the flip side, just as long to air dry.
The core issue with low porosity hair isn’t a lack of trying; it's about getting that stubborn cuticle to lift just enough to let moisture in. This is where gentle heat becomes your best friend. A steamer, a thermal conditioning cap, or even just the warm steam from your shower can help those "shingles" lift ever so slightly, creating a welcome mat for hydration.
If you skip this step, even the most hydrating products will just sit on the surface. You'll end up with that frustrating paradox: dry hair that's also weighed down by product buildup.
The real breakthrough comes when you start working with your hair's natural structure, not fighting against it. The goal isn't to force heavy products onto a sealed surface. It's to gently coax the cuticle open, deliver lightweight moisture, and then let it seal back down to lock in all that goodness.
If you’re still not sure, here are a few dead giveaways that you're on the low porosity team:
You're not alone in this. The global market for hair porosity products was recently valued at $512.4 million and is projected to more than double as more people seek out the right solutions. In fact, some studies show that up to 60% of people with low porosity hair name dryness as their primary frustration, which explains the huge demand for smarter, lighter product formulas.
Getting a handle on these core concepts is the most important first step you can take. Once you truly understand why your hair acts the way it does, building a routine that actually works becomes so much easier. For a deeper look into the science of all hair structures, check out our guide on understanding your hair type. This is the knowledge that will empower you to finally give your hair the deep, lasting moisture it deserves.
Figuring out how to moisturize low porosity hair can feel like trying to solve a puzzle, but your wash day is where all the pieces come together. This is your prime opportunity to thoughtfully get hydration into strands that are naturally built to resist it. We're not just coating the hair here; we're creating a smart process that gently coaxes the cuticle open, delivers a ton of water-based goodness, and then locks it all in for softness that actually lasts.
Let's ditch the generic advice and build a routine that actually works. The whole strategy boils down to a simple, three-part concept: gently prepare the hair, flood it with water and lightweight conditioners, and then seal the deal.
This visual gives you a great overview of the core strategy, taking you from prep all the way to sealing in that precious moisture.
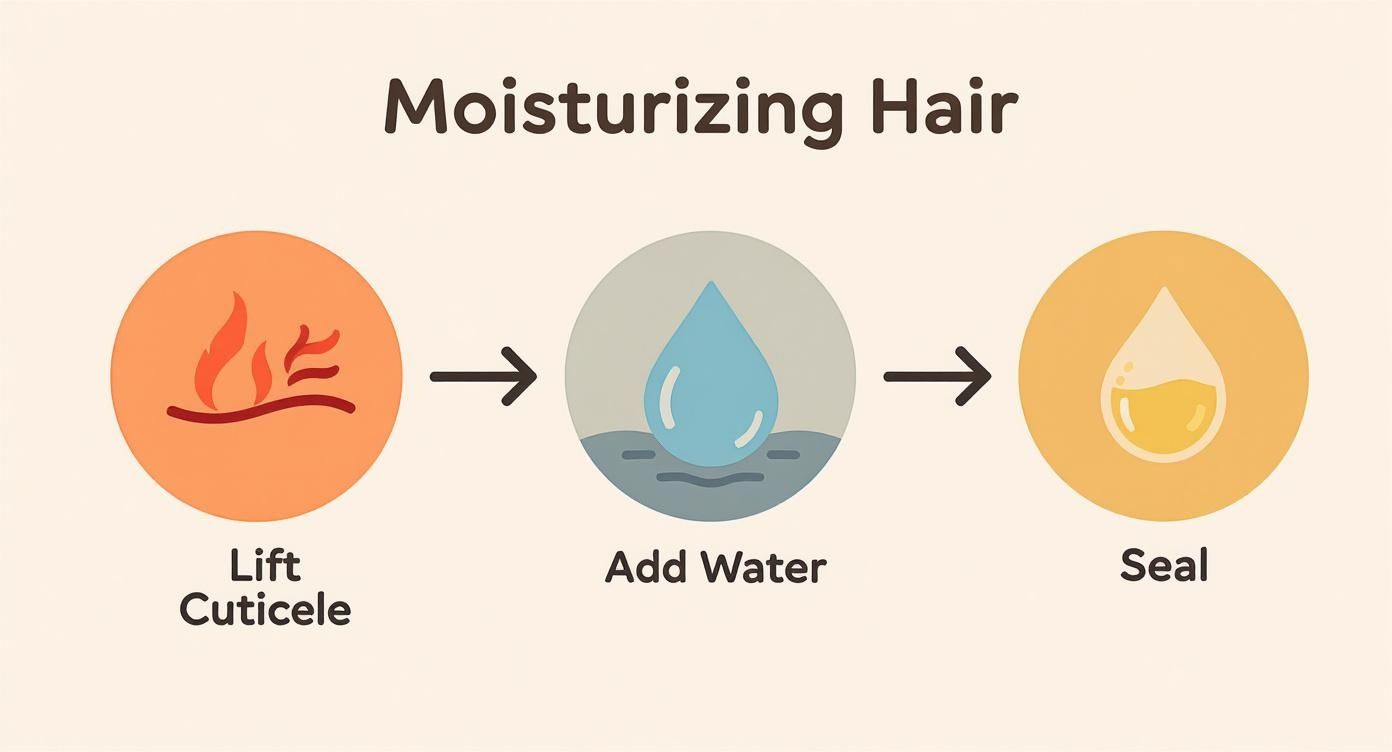
As the infographic shows, think of it this way: heat is the key that unlocks the door, water is the guest you're inviting in, and a light oil is the lock that makes sure it stays.
Before your shampoo even comes near your head, you should be thinking about a pre-poo treatment. For low porosity hair, this step is a total game-changer. It creates a protective buffer, shielding your strands from the drying effects of even the most gentle shampoo and helping your hair hang onto its natural oils.
The trick is picking the right oil. You need something with smaller molecules that can actually wiggle their way into the hair shaft instead of just creating a greasy film on top.
To get started, lightly mist your hair with warm water from a spray bottle. Work a small amount of your chosen oil from roots to ends, pop on a plastic cap, and chill for at least 30 minutes. The warmth trapped under the cap is what really helps the oil do its job.
The point of washing your hair is to get rid of buildup, dirt, and excess oil—not to blast away every last drop of moisture. This is critical for low porosity hair, which is notorious for buildup that blocks any moisture you try to add later. A harsh shampoo loaded with sulfates is your worst enemy; it will leave your hair feeling squeaky, parched, and even more resistant.
Instead, reach for a gentle, sulfate-free clarifying shampoo. Use it every 2-4 weeks to give your hair a truly clean slate. For all the washes in between, a good moisturizing, water-based shampoo is all you need. When you're washing, really focus the shampoo on your scalp—that’s where the gunk accumulates—and just let the suds run down the lengths of your hair as you rinse.
Okay, this is the main event. Just slapping some conditioner on your hair and rinsing it out two minutes later is going to do next to nothing for those tightly packed cuticles. You have to create an environment that actually encourages the conditioner to sink in.
This is where gentle heat is absolutely non-negotiable. After you've worked in a generous amount of a lightweight, hydrating conditioner, you need to add warmth to help lift the cuticle.
Pro Tip: Use a quality deep conditioner that’s built to hydrate without being too heavy, like the Morfose Collagen Hair Mask. For maximum effect, apply it to soaking wet hair—the water will literally help carry the conditioning ingredients into the hair strand.
Once your hair is coated in conditioner, cover it with a plastic processing cap. From there, you have a few options:
This one change turns a basic conditioning step into a deep, restorative treatment. If you want to get even more specific about your product choices, you can explore our guide on understanding the difference between deep conditioner and conditioner to really dial in your routine.
How you apply your conditioner is just as important as what you apply. Don't just rake it through and hope for the best. Instead, try the "squish to condish" method.
With your hair dripping wet and saturated with conditioner, take a section, cup it in your hands, and gently scrunch it upwards toward your scalp. You’re listening for a "squishing" sound—that's the sound of you physically pushing water and conditioner into the hair cuticle.
This technique is amazing because it actively encourages absorption and helps your natural curl pattern start to form beautiful clumps. Keep doing this all over your head until your hair feels silky and smooth, almost like seaweed. When it’s time to rinse, use lukewarm water and don’t be afraid to leave a little of that slippery feeling behind. It acts as a perfect first layer of leave-in moisture.
Walking down the hair care aisle can feel like a pop quiz you didn't study for. With a sea of bottles all screaming "HYDRATION!", how do you find the one that actually works for your low porosity hair? The secret isn't on the front of the bottle; it's in the fine print on the back. Learning to read an ingredient list is the single most powerful tool you'll have in your arsenal.
Think of it this way: your hair has a bouncer at the door—the tightly sealed cuticle. You can't just force your way in with heavy, clunky ingredients. You need ones that are clever and small enough to slip past security. That’s where the magic really happens.

Your focus needs to be on two key players: humectants and lightweight emollients. They're a dynamic duo. One pulls moisture in, and the other gently locks the door behind it without weighing your hair down.
Humectants are basically moisture magnets. They have this amazing ability to pull water molecules right out of the air and draw them into your hair shaft. For hair that actively resists water, this is a total game-changer.
Keep an eye out for these champions on your product labels:
The proof is in the science. Studies have shown that formulas with just 5-10% glycerin can increase hair moisture by a whopping 25% compared to products without it. And in a recent survey, 78% of people with low porosity hair reported a noticeable difference after switching to humectant-rich products. It's not just hype. You can find more details about how humectants help low porosity hair on WebMD.com.
Okay, so you’ve drawn all that good moisture into your hair. Now what? You have to keep it there. This is where lightweight oils—or emollients—come into play. And I can't stress lightweight enough. Heavy oils and thick butters just sit on top of your hair, creating a greasy, suffocating film. No thanks.
A huge mistake I see people make is grabbing the coconut oil. It’s great for some, but for low porosity hair, its molecules are just too big. It’s like putting a plastic bag over your hair—nothing else is getting in or out, leading to buildup and dryness underneath.
The goal is a thin, breathable seal that traps water without smothering the hair shaft. You want oils that absorb quickly and feel almost "dry" to the touch.
Knowing what to look for is only half the battle. You also need to know what to run from. For our hair type, some popular ingredients are guaranteed to cause more harm than good, leading to that dreaded stiff, coated, and lifeless feeling.
To make it simple, here’s a quick-reference guide to help you scan those ingredient lists like a pro.
| Ingredient Type | Embrace These (Lightweight & Penetrating) | Avoid These (Heavy & Coating) |
|---|---|---|
| Oils | Argan, Grapeseed, Jojoba, Sweet Almond Oil | Castor Oil, Coconut Oil, Olive Oil |
| Butters | Skip them or use very sparingly in stylers | Shea Butter, Cocoa Butter, Mango Butter |
| Humectants | Glycerin, Aloe Vera, Honey, Panthenol | Propylene Glycol (can sometimes feel sticky) |
| Proteins | Silk Amino Acids, Hydrolyzed Proteins (small molecules) | Large, un-hydrolyzed proteins (use sparingly) |
By becoming a savvy label reader, you take back control. You stop throwing money away on products that fight your hair's nature and start building a routine with ingredients that actually work. This is the true foundation for finally getting the soft, moisturized hair you’ve been chasing.
Alright, you've made it through the wash and deep condition. Your hair is clean and packed with moisture, but the job's not done yet. Now comes the most critical part: locking it all in. This is where mastering product layering makes all the difference between hair that stays soft and hydrated for days and strands that feel parched by evening.
The entire goal here is to create a lightweight seal that traps water inside your hair shaft, but—and this is a big but for low porosity hair—without causing greasy, heavy buildup. It's a delicate dance. Piling on heavy butters and oils is a surefire way to get weighed-down, lifeless hair. The secret lies in using the right products, in the right order.
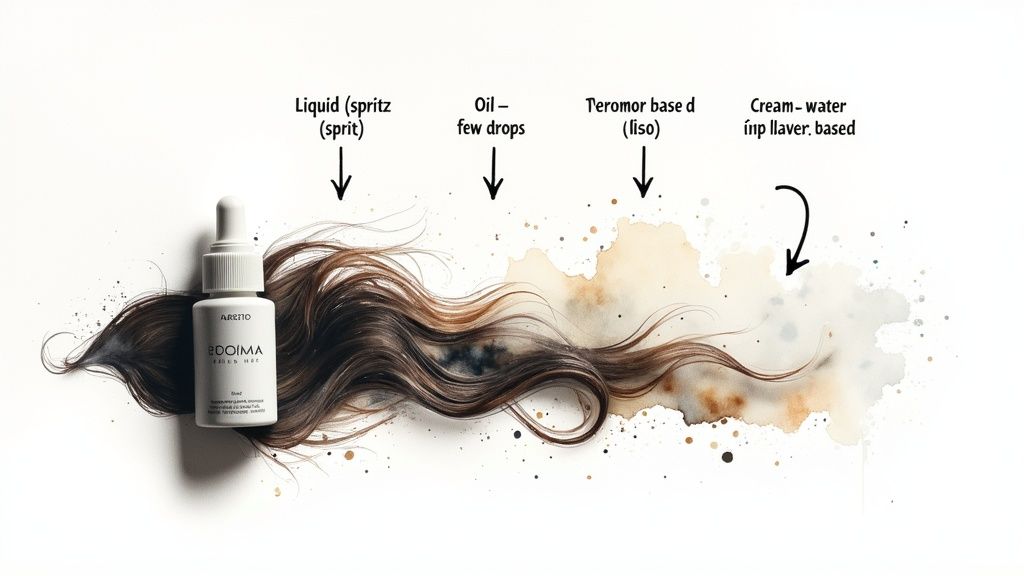
If you've spent any time in natural hair forums, you’ve seen the acronyms LOC and LCO thrown around. They aren't just trendy jargon; they're strategic layering routines that can be game-changers for low porosity hair.
So, which one should you choose? Honestly, there’s no universal right answer. It really comes down to what your specific hair prefers. I've found that many people with low porosity hair lean towards the LCO method. Applying the oil last seems to create a more robust seal over the water and cream layers.
But the only way to know for sure is to play scientist. Give one method a solid try for a few weeks, then switch to the other. Pay close attention to which one gives you longer-lasting hydration and better-defined styles.
Whether you land on LOC or LCO, how you apply the products is just as important as the order. Your success hinges on a few small details that ensure you’re actually sealing in moisture, not just slathering product on top of dry hair.
First things first, your "Liquid" layer is everything. And I don't mean a light misting—your hair needs to be damp to wet when you start. Water is the true moisturizer; your products are just there to help your hair hang onto it. A lightweight, water-based spray like the Morfose Milk Therapy Two Phase Conditioner is perfect for this step because it adds hydration and amino acids without any heavy, buildup-prone silicones. You can dive deeper into this in our ultimate guide to leave-in conditioner.
Next up is your cream or oil. The golden rule for low porosity hair will always be: less is more. When you're applying oil, think in drops, not palmfuls. For creams, start with a dime-sized amount for each section of your hair. You can always add a tiny bit more if you need it, but you can’t undo a greasy mess.
The LOC method isn't just a trend; it's a proven technique. A global survey of hair care consumers found that 65% of those with low porosity hair use it regularly. An incredible 82% of them reported better moisture retention as a result. This shift is even showing up in market trends, with sales for lightweight leave-ins and oils jumping by 20% in recent years.
Finally, let’s talk technique. Don’t just slap the product onto your hair. Take the time to work in sections. Use the "praying hands" method (smoothing your hair between your palms) or gently rake the product through with your fingers. This not only ensures every single strand is coated but also helps encourage your natural curl pattern to clump and form beautifully. This mindful, systematic approach is how you finally win the battle for lasting moisture.
Having the right products and techniques is a huge part of the equation, but it’s not the whole story. If your routine feels like a massive chore, you’ll eventually burn out and find yourself right back at square one with dry, stubborn hair. The real secret to long-term success with low porosity hair is building a consistent schedule that actually fits into your life.
Forget about trying to follow a rigid, complicated set of rules. Think of this as a flexible blueprint, a starting point you can tweak and adjust. The goal here is to get into a natural rhythm of deep hydration, simple refreshes, and protective rest that keeps your hair feeling soft all week long.
When you nail this down, hair care stops being a task and starts feeling more like a self-care ritual. You'll learn to listen to what your hair needs and respond with a predictable pattern, finally achieving that lasting moisture you've been working so hard for.
Consistency is the glue that holds all these steps together. Here’s a peek at what a typical week could look like, all designed to pack in moisture without causing buildup or taking over your entire schedule.
Day 1: Wash Day (The Main Event)
This is your foundation for the whole week, so you want to get it right. Following the process we've already walked through, this day is all about deep hydration.
Days 2-4: Maintain and Protect
For the next few days, your hair should still feel great from wash day. Your main job is simply to preserve that moisture.
Days 5-7: Refresh and Revive
Toward the end of the week, you might feel your hair getting a little thirsty. That's perfectly normal, and it’s time for a quick mid-week refresh.
Don’t go overboard with products when you refresh. The goal is to rehydrate, not to pile on more stuff. Often, a little steam or a light mist of water is all it takes to bring your hair back to life until your next wash day.
Even with the best weekly routine, things like product residue and minerals from hard water can build up over time. That’s why a monthly reset is so important for keeping your hair open to receiving moisture.
Think of it as a tune-up for your hair. Once every 3-4 weeks, switch out your regular shampoo for a good sulfate-free clarifying shampoo. This gets rid of any stubborn gunk that might be blocking moisture from penetrating, giving your hair a clean slate.
On clarifying day, be sure to follow up with an extra-rich deep conditioning treatment. Your hair will be squeaky clean and ready to soak up all the nutrients from your conditioner, making it the most effective treatment you’ll do all month. This simple ritual ensures all your weekly efforts don't go to waste.
Even when you think you've got your routine down pat, low porosity hair can throw you a curveball. It’s totally normal to hit a roadblock and wonder what you’re missing. We've compiled some of the most common questions we hear to help you fine-tune your approach and get that lasting moisture you're after.
Sometimes, understanding these common issues is the final piece of the puzzle. A few small tweaks based on how your hair is actually behaving can make all the difference.
This is the quintessential low porosity struggle. Nine times out of ten, the culprit is a combination of two things: a product that's too heavy and a lack of heat. If your deep conditioner is super thick and you're applying it in a cold room, it’s just going to sit on top of your hair. Your tightly sealed cuticles need a little persuasion to open up and let the good stuff in.
Thankfully, the fix is simple but essential: introduce gentle warmth to your conditioning sessions.
This one change transforms a surface-level treatment into a deep-penetrating moisture boost, giving the conditioner a real chance to get inside the hair shaft where it can actually do its job.
Ah, coconut oil. While it’s a miracle worker for some, it's often a no-go for low porosity hair, especially as a daily moisturizer. The problem is its molecular size—the molecules are just too large to get past that tight cuticle layer.
Instead of penetrating, it just coats the hair shaft. This can backfire by creating a seal that blocks water and other hydrating products from getting in. You end up with hair that feels slick or greasy on the outside but is still completely parched underneath.
You'll almost certainly get better results from lighter oils that can actually sink in. Your best bets are oils like argan, jojoba, or grapeseed. Their smaller molecules can sneak past the cuticle to seal moisture in without creating that heavy, suffocating buildup.
Think of clarifying as hitting the reset button. For low porosity hair, it's non-negotiable. This hair type is incredibly prone to product buildup, which is a major moisture-blocker. If you skip clarifying, you'll find that even your most trusted products suddenly stop working because they can't get through the film on your hair.
A good rule of thumb is to use a gentle, sulfate-free clarifying shampoo once every 3-4 weeks. But listen to your hair—this isn't a hard and fast rule. You might need to do it more often if you:
Pay attention to the signs. If your hair starts feeling dull, limp, or just stops responding to your products, it’s screaming for a clarifying session. Keeping that canvas clean is the key to letting hydration in.
Ready to give your hair the lightweight, effective moisture it's been waiting for? The Morfose collection is built with smart ingredients that work with your hair's unique structure, not against it. Find your new holy grail routine today.
