Flash Sale 70% Off
Give customers details about the banner image(s) or content on the template.
Are You One of Our Winners?

A hot oil treatment is one of the most nourishing rituals you can do for natural hair. It’s a simple, classic practice where you apply warmed, nutrient-packed oils to your hair and scalp. By using just a bit of gentle heat, the treatment helps open up your hair's cuticle, letting all that goodness sink in deep. This is the secret to strengthening your strands, cutting down on breakage, and getting a truly brilliant shine.
For anyone with curls, coils, or kinks, this is a must-have in your hair care arsenal.
If your natural hair constantly feels dry, brittle, or seems to have a mind of its own when it comes to frizz, you're definitely not alone. The beautiful, unique structure of curly and coily hair makes it a challenge for the natural oils from your scalp to travel all the way down to the ends. This often leaves them feeling thirsty and neglected.
This is exactly why a hot oil treatment for natural hair is so much more than a pampering session—it’s a fundamental part of keeping your hair healthy and vibrant.
The science behind it is pretty straightforward. When you warm up natural oils, they become less thick and their molecules get energized. That warmth gently encourages the hair's protective outer layer, the cuticle, to lift just enough. For anyone with low-porosity hair, where those cuticles are usually shut tight, this is a total game-changer. It creates the perfect opportunity for the oil to dive deep into the hair shaft and deliver moisture exactly where it's needed.
Picture a dry sponge. If you pour cold water on it, most of it just rolls right off. But warm water gets absorbed much faster and more completely. A hot oil treatment works on the very same principle, making sure all those beneficial fatty acids, vitamins, and minerals in the oil don't just sit on top of your hair but actually get inside.
This deep-down moisture boost delivers some incredible benefits:
And this isn't just a quick fix. When you make this a regular part of your routine, you're building a stronger, more resilient foundation for your hair's long-term health.
Think of a hot oil treatment as a protective shield. It fills in the tiny gaps along the hair shaft caused by everyday wear and tear, reinforcing each strand against future damage from heat, styling, and the environment.
The magic of a hot oil treatment doesn't stop at your strands—it extends right to your scalp, which is the literal foundation for healthy hair growth.
Massaging warm oil into your scalp feels amazing, but it also gets the blood flowing. Better circulation means more oxygen and nutrients are delivered straight to your hair follicles, creating the ideal environment for strong, healthy hair to grow.
If you struggle with a dry, itchy, or flaky scalp, this can be a lifesaver. The oils provide direct moisture to the skin, soothing irritation and helping to balance your scalp’s natural oil production over time.
This focus on total hair and scalp wellness is a growing trend. The global hair oil market, currently valued at around USD 4.50 billion, is expected to hit nearly USD 6.20 billion by 2033. A big reason for this is a greater awareness of hair and scalp conditions like alopecia areata, which affects roughly 7 million Americans. People are actively seeking therapeutic treatments that improve scalp circulation and hair strength.
Ultimately, adding a hot oil treatment to your regimen is a powerful step toward reaching your hair goals, whether that’s retaining length, getting more defined curls, or just enjoying softer, more manageable hair. By understanding why it works, you can really appreciate the role it plays in your natural hair journey. For a deeper dive, check out our guide on the role of oils in professional hair care.
Picking the right oil for your hot oil treatment for natural hair is probably the most crucial part of the whole process. It's what makes the treatment truly yours. I know the sheer number of oils out there can feel overwhelming, but once you understand the basic difference between them, you’ll feel confident picking the perfect one for your curls.
The secret is knowing that not all oils do the same job. Some are fantastic at moisturizing, while others are all about sealing that moisture in.
It’s no surprise that natural hair care has exploded in popularity. The market, estimated at USD 12.5 billion, is expected to hit nearly USD 19 billion by 2034, largely because we're all looking for products without harsh chemicals. Hot oil treatments, built on timeless ingredients like olive, castor, and coconut oil, are a perfect example of this return to effective, natural regimens. You can read more about the trends shaping the natural hair care market to see just how big this movement is.
Understanding the different roles oils play is where you’ll see the best results.
Picture your hair strand as a tiny fortress. To keep it strong, you need oils that can get inside the walls (penetrating oils) and oils that can stand guard outside (sealing oils).
Penetrating Oils: These are your moisturizers. Their molecular structure is small enough to actually get inside the hair shaft, delivering vitamins and fatty acids right where they’re needed. This is what hydrates and strengthens your hair from the inside out.
Sealing Oils: These are your protectors. Their molecules are bigger, so they don’t sink in. Instead, they coat the outside of your hair, creating a barrier that locks in all the good stuff and prevents moisture from escaping.
Honestly, the best hot oil treatments usually involve a mix of both. You want to drench your hair in moisture and then make sure it stays there for long-lasting softness and shine. For a deeper dive, our guide on the benefits and uses of natural oils for hair breaks it down even further.
Your hair's personality—its porosity, texture, and density—is your best guide. An oil that works miracles on coarse, high-porosity hair could easily weigh down fine, low-porosity waves. Let's get specific.
For Low Porosity Hair
If your hair has tightly sealed cuticles, moisture has a hard time getting in. You need lightweight oils that can sneak past the defenses without just sitting on top and feeling greasy.
Pro Tip: For my low-porosity folks, applying your hot oil treatment with a bit of gentle heat from a steamer or hooded dryer is a total game-changer. The steam helps lift those stubborn cuticles just enough to let the oils penetrate and do their job.
For High Porosity Hair
Your hair absorbs moisture like a sponge but loses it just as fast. The goal here is to use richer oils that can fill in the gaps in the cuticle and seal them shut.
For Fine or Thinning Hair
If your hair gets weighed down by, well, almost anything, you’ll want to stick with the lightest oils you can find. The goal is to get the benefits without sacrificing any of your precious volume.
To make things even easier, I've put together this quick-reference table. Think of it as your cheat sheet for finding the perfect oil for your hair's needs.
| Oil | Primary Benefit | Best For Hair Type | Key Properties |
|---|---|---|---|
| Coconut Oil | Deep Moisturization | Dry, Damaged, Medium-Coarse | Penetrates deeply, reduces protein loss |
| Olive Oil | Strength & Moisture | High Porosity, Coarse | Rich in fatty acids, strengthens strands |
| Avocado Oil | Repair & Hydration | Dry, Brittle, High Porosity | Full of vitamins A, D, and E, nourishes |
| Argan Oil | Frizz Control & Shine | All Types, especially Low Porosity | Lightweight, rich in antioxidants |
| Jojoba Oil | Scalp Balance & Softness | Fine Hair, Oily Scalps | Mimics natural sebum, non-greasy |
| Castor Oil | Sealing & Growth | Coarse, Thick, Thinning Hair | Very thick, humectant, stimulates scalp |
| Grapeseed Oil | Lightweight Moisture | Fine Hair, Low Porosity | Extremely light, easily absorbed, non-greasy |
Once you get a feel for how these oils work, you can stop relying on generic advice and start creating a custom hot oil treatment that gives your natural hair exactly what it’s been craving.
This is where the real magic happens. A hot oil treatment for natural hair is so much more than just another step in your routine; it’s a moment to reconnect with your hair and give it exactly what it needs. Let’s walk through the hands-on process to make sure you get those amazing, salon-worthy results right in your own bathroom.
Think of it this way: trying to apply oil to dirty, product-caked hair is like trying to moisturize your skin through a raincoat. It just won't work. For the oil to truly penetrate the hair shaft and deliver all its nutrients, it needs a clean slate.
That’s why you should always start with freshly washed, damp hair. You don’t want it soaking wet, because all that extra water will just dilute the oil. A good rule of thumb is to gently towel-blot until it’s about 70-80% dry. This leaves it perfectly receptive to soak up all the goodness you’re about to apply.
The "hot" in hot oil treatment is crucial, but getting the temperature right is everything. If you overheat the oil, you can destroy its delicate nutrients and, more importantly, risk burning your scalp. The goal is comfortably warm, not scalding hot.
The safest and most reliable way to do this is with a simple hot water bath.
Before a single drop touches your scalp, always do a patch test. Dab a small amount of the warmed oil on the inside of your wrist. It should feel soothing, never uncomfortably hot. This simple check takes just a few seconds and is non-negotiable for safety.
Alright, now for the best part. To make sure every single strand gets the attention it deserves, you have to work in sections. Trust me, trying to tackle your whole head at once is a recipe for missed spots and uneven results.
Grab some clips and divide your damp hair into four to six sections. This instantly makes the process feel more manageable and guarantees a thorough coating.
Start with one section and use your fingers or an applicator bottle to apply the warm oil directly to your scalp. Take your time here—this is your chance to focus on scalp health. Once your scalp is covered, gently work the oil down the length of your hair, paying special attention to your ends. They're usually the driest part and need the most love.
This flow chart breaks down the thought process, from figuring out your hair’s needs to mixing the perfect oil blend.
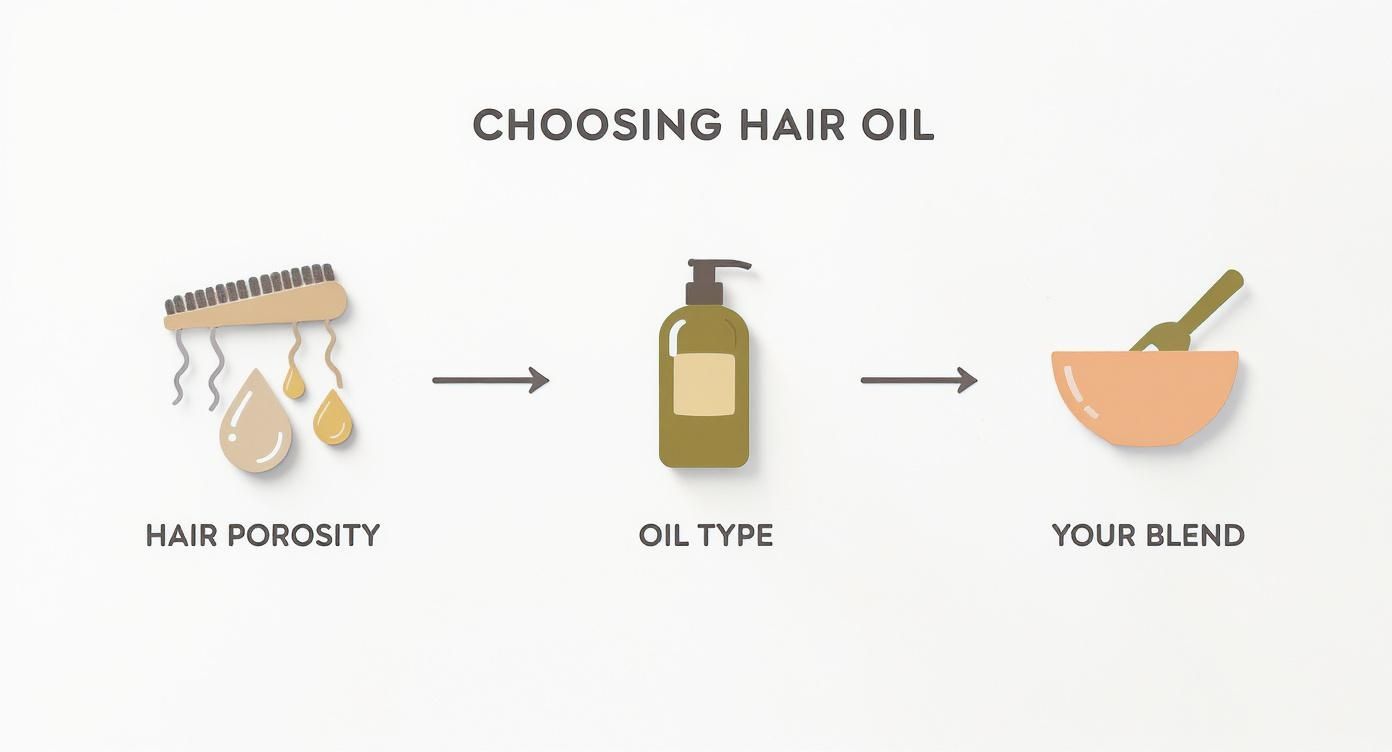
As you can see, a great treatment starts with understanding your hair's porosity before you even pick out your oils.
Once the oil is in, it's time for a scalp massage. Use the pads of your fingers—never your nails—and apply gentle pressure in slow, circular motions for at least five minutes. Not only does this feel incredible, but it also stimulates blood flow to your hair follicles, which is fantastic for encouraging healthy growth.
After you’ve applied the oil and massaged your scalp, you need to trap some heat to help the oil penetrate as deeply as possible. This is where a simple plastic processing cap becomes your best friend.
Gather all of your oily hair, tuck it underneath the cap, and you're set. The plastic traps your natural body heat, creating a gentle sauna-like effect that helps lift the hair's cuticles. This simple trick is what turns a surface-level coating into a deep, restorative conditioning session.
Want an extra boost? You can wrap a warm, damp towel around the plastic cap. Or, if you have one, sit under a hooded dryer on a low setting for 15-20 minutes. This added heat is a game-changer for anyone with low-porosity hair, giving those tightly-sealed cuticles the extra nudge they need to open up.
Alright, you've done the hard part. You’ve massaged that glorious warm oil into your hair and scalp and you’re all wrapped up in a shower cap. But don't just set a timer and forget it! This next phase—the waiting and rinsing—is what truly seals the deal for your hot oil treatment for natural hair. Nailing this part is what transforms a good treatment into a great one, leaving your hair feeling incredibly soft and deeply moisturized.
So, the big question is always, "How long do I leave it in?" Honestly, it comes down to what your hair is telling you and how much time you've got.
Once your time is up, the goal is to rinse out the excess oil—not all the nourishing goodness you just put in. This is a delicate balance, and it’s where a lot of people accidentally undo their hard work by grabbing a harsh, sudsy shampoo.
Think of it this way: you wouldn't wash a delicate silk blouse with heavy-duty laundry detergent. Your hair deserves that same gentle touch after a treatment.
Your best friend here is a good co-wash (cleansing conditioner). It's specifically designed to clean your hair just enough to remove residue without stripping away essential moisture. If you don't have a co-wash, your next best bet is a gentle, sulfate-free moisturizing shampoo. Always use lukewarm water for this step; hot water can strip the oils right back out, while cold water just won't be effective at rinsing.
Don't be afraid to shampoo twice if you need to, especially if you used a heavier oil like castor oil. The key is to use a gentle, moisturizing product both times. Your hair should feel soft and hydrated after rinsing, not squeaky clean.
To really get the most out of every single treatment, you need to know what not to do. I’ve seen these common mistakes trip people up time and time again.
Mistake 1: Applying Oil to Dirty Hair
This is the number one slip-up. Layering oil over product buildup, dirt, and sebum creates a barrier that prevents the treatment from ever actually reaching your hair shaft. For the best results, always start with freshly cleansed, damp hair.
Mistake 2: Using Oil That’s Too Hot
This is a huge one. More heat does not equal better results. Overheated oil can fry your hair’s protein structure and, much worse, give you a nasty scalp burn. Always, always test the temperature on your inner wrist first. It should feel pleasantly warm, not hot.
Mistake 3: Rinsing with Hot Water
Blasting your hair with hot water right after a deep conditioning treatment is totally counterproductive. It throws the hair cuticle wide open again, letting all that moisture escape. Stick to lukewarm water for the rinse, and if you can brave it, finish with a quick cool shot to seal that cuticle shut.
It's no surprise that consumer feedback consistently highlights moisturizing benefits (31.1%) as the top reason people love hair treatments. The industry is taking note, with analysts predicting that hybrid products like heat-free bonding oils will fuel 12% annual growth in this category by 2026. You can dive deeper into these trends in hot oil hair treatment on Accio.com. This just confirms what we already know: effective, deep moisture is what we're all after, and a well-executed hot oil routine delivers just that.
When it comes to natural hair, there’s no such thing as "one size fits all." Your curls have their own personality, which means your hot oil treatment for natural hair needs to be dialed in to what they truly need. Customizing your routine is the secret sauce to getting incredible results, whether you’re trying to tame frizz, build up strength, or keep your color looking fresh.
Think of it like skincare—you wouldn't use the same products for oily skin as you would for dry, flaky skin. The same exact logic applies to your hair. By simply tweaking the oils you use, how long you leave the treatment on, and how often you do it, you can create a powerful, targeted solution for your biggest hair frustrations. This isn't just about slathering on some oil; it's about giving your hair the specific nourishment it’s been craving.
So, let's get into how to adjust your treatment for your unique hair type and goals.
If you have fine hair, I know the word "oil" can sound a little scary. The fear of ending up with greasy, flat strands is totally valid, but that doesn't mean you have to miss out on the benefits of a hot oil treatment. The trick is to choose lightweight oils and keep the whole process short and sweet.
You'll want to reach for oils that sink in fast and don’t leave a heavy film behind. Think grapeseed, argan, and sweet almond oil—these will be your absolute best friends. They're brilliant for delivering moisture and a beautiful sheen without killing your volume.
For those of us with coarse, thick, or seriously thirsty hair, a hot oil treatment isn't just a luxury—it's a lifeline. Your hair is built to handle (and will absolutely love you for) richer, more intense moisturizing sessions. The goal here is deep, lasting hydration.
This is where heavier, more emollient oils get to shine. I'm talking about olive oil, avocado oil, and the powerhouse that is Jamaican black castor oil. These are loaded with fatty acids that can penetrate and fortify thick, dense strands like nothing else.
An overnight hot oil treatment can be an absolute game-changer for very porous or coarse hair. After you apply the warm oil, pop on a plastic cap and then wrap your head in a silk or satin scarf. This protects your pillows and, more importantly, traps all that moisture in while you sleep.
For a deeply restorative mix, combine two tablespoons of olive oil with one tablespoon of avocado oil and just a teaspoon of castor oil. This trio is a powerhouse against dryness and will leave your hair feeling incredibly soft and manageable for days.
Color-treated hair needs a bit of extra TLC. Chemical processing can make your hair more porous, leaving it vulnerable to moisture loss and, you guessed it, color fade. A good hot oil treatment helps seal the hair's cuticle, which is key to locking in both moisture and that vibrant color you paid for.
You’ll want to select oils known for their protective, cuticle-sealing magic. Argan oil is a fantastic choice because its antioxidants help protect against damage while adding a gorgeous shine. Grapeseed oil is another winner—it’s light but incredibly effective at sealing everything in.
To protect your investment, aim to treat your hair every two weeks. This frequency keeps your strands feeling supple and your color looking brilliant without overloading your hair with product.
When you’re dealing with thinning hair, the focus shifts a little. It’s not just about the strands; it’s about the scalp. A healthy, happy scalp is the foundation for strong hair growth, so your hot oil treatment should feature ingredients that get the blood flowing.
Your base oil should still be light—jojoba or almond oil are perfect. The real magic, though, comes from adding a few drops of stimulating essential oils.
Growth-Boosting Blend: Mix two tablespoons of jojoba oil with 3-5 drops of rosemary essential oil and 2-3 drops of peppermint oil. Gently massage this mixture into your scalp for a good five minutes to really get those stimulating effects going. And if you're struggling to get moisture into stubborn strands in the first place, our guide on how to moisturize low porosity hair has some fantastic strategies that pair perfectly with these targeted treatments.
Even after you've got the basics down, it’s normal to have a few questions. A hot oil treatment for natural hair is pretty straightforward, but a few small adjustments can seriously level up your results. I get asked these questions all the time, so I've put together some clear, no-fuss answers.
Let's walk through some of the common uncertainties so you can approach your next treatment with total confidence.
When it comes to hot oil treatments, consistency is everything. For most people with natural hair, a treatment every two weeks hits the sweet spot. It's frequent enough to keep your hair moisturized and nourished without causing any kind of buildup.
That said, you always have to listen to your hair. It will tell you what it needs.
My advice? Start with every two weeks and see how your hair responds. You’ll figure out your perfect rhythm pretty quickly.
Yes, absolutely! In fact, hot oil treatments are a game-changer for low porosity hair. The biggest struggle with this hair type is getting moisture past its tightly-packed cuticle layer. The gentle heat from the oil is your secret weapon here.
The warmth coaxes those stubborn cuticles to lift just enough for the oil to actually sink into the hair shaft, rather than just coating the surface. For best results, I'd recommend sticking with lighter oils that absorb easily, like argan, grapeseed, or almond oil.
Pro Tip for Low Porosity Hair: To really maximize absorption, apply the oil and then spend about 20 minutes under a hair steamer or hooded dryer. The extra steam and consistent heat give those cuticles the final push they need to open up and soak in all that oily goodness.
For the best moisturizing results, you should always apply your hot oil treatment to clean, damp hair. There are a couple of really good reasons for this. First, think of oil and water as a hydration power couple. The oil seals in the water that’s already in your damp strands, which locks in moisture on a much deeper level.
Trying to apply oil to dirty, dry hair just doesn't work as well. The oil has to battle through product buildup and grime, which means a lot less of it will actually penetrate your hair. A quick shampoo and a gentle towel-dry creates the ideal slate for your treatment.
Leaving a treatment in overnight can feel like a miracle for some hair types, but it's really best for those with very dry, coarse, or high-porosity natural hair. The extra time gives thicker, richer oils a chance to fully absorb, leaving your hair feeling incredibly soft and pliable by morning.
If you're going to give it a try, just make sure to apply the warm oil, pop on a plastic cap, and wrap it all up in a silk or satin scarf to keep your pillows clean.
But for those with finer hair or an oily-prone scalp, an overnight session is probably overkill. It can easily weigh your hair down and leave your roots feeling greasy. For most of us, a solid 30-60 minute treatment is more than enough time to get all the strength and moisture we need.
Ready to give your hair the professional-level care it deserves? The Morfose collection is designed with targeted solutions to repair damage, lock in moisture, and restore your hair's natural brilliance.
Explore our restorative hair treatments and find your perfect match at Morfose today!
